
As I flipped through an old recipe book recently, my eyes landed on a nostalgic favorite: Earthquake Cake. This whimsical dessert might sound daunting, but it’s a delightful surprise that transforms simple ingredients into a fudgy wonder, making it a crowd-pleaser for any gathering. Whipping up this cake is a breeze, allowing you to spend less time in the kitchen and more time savoring those moments with friends and family. Plus, its eccentric appearance and rich layers are sure to spark conversation and admiration from guests, proving that you don’t need to be a master baker to create something show-stopping. What’s the best part? This cake can be a sweet remedy for your fast-food fatigue! Are you ready to unleash your inner baking genius and try something new?
Why is Earthquake Cake so irresistible?
Delightful Surprise: This Earthquake Cake combines familiar ingredients in an unexpected way, delivering a uniquely fudgy texture with every bite.
Easily Accessible: Using simple staples you likely have on hand, this cake makes baking feasible for everyone, regardless of experience.
Time-Saver: You can whip it up in less than an hour, leaving more time to enjoy it with loved ones.
Crowd-Pleaser: Its whimsical look and blend of rich flavors make it a perfect centerpiece for any occasion, sure to impress your guests.
Unforgettable Flavor: The combination of chocolate, cream cheese, and nuts creates an indulgent treat that stands out from your usual desserts. Create excitement at your next gathering with this fun take on cake! For more heartfelt dessert ideas, check out my guide on delicious homemade treats.
Earthquake Cake Ingredients
• Get ready to create a fudgy masterpiece!
For the Cake Base
- All-purpose flour – This staple gives the Earthquake Cake its structure, ensuring it rises beautifully.
- Granulated sugar – Sweetens the cake while enhancing its richness.
- Cocoa powder – Adds that deep chocolate flavor which is essential for a decadent experience.
- Baking powder – Helps the cake rise; make sure it’s fresh for the best results.
- Salt – Balances the sweetness and amplifies the other flavors in the cake.
- Eggs – Bind the ingredients together; use room temperature eggs for better incorporation.
- Milk – Keeps the cake moist; substitute with almond milk for a dairy-free version.
- Vegetable oil – Adds richness and keeps the cake tender; can be replaced with melted butter for extra flavor.
For the Cream Cheese Layer
- Cream cheese – This creamy goodness provides a rich and tangy contrast to the chocolate. Ensure it’s softened for easy mixing.
- Powdered sugar – Sweetens and smooths out the cream cheese; this helps it spread easily in the cake.
- Vanilla extract – Infuses a warm aroma and flavor that complements the other ingredients beautifully.
For Toppings
- Chopped pecans or walnuts – Adds crunch and nutty flavor; feel free to substitute with your favorite nuts for a personalized touch.
- Chocolate chips – Elevate the chocolate flavor; mix semi-sweet and dark for an extra indulgent bite.
With these ingredients, you’re all set to create an Earthquake Cake that will both delight and impress!
Step‑by‑Step Instructions for Earthquake Cake
Step 1: Preheat and Prepare
Begin by preheating your oven to 350°F (175°C). Grease a 9×13 inch baking pan generously with cooking spray or butter to ensure easy removal of the Earthquake Cake later. As you prepare the pan, gather your ingredients and mixing bowls to streamline your baking process, making it all the more enjoyable.
Step 2: Mix the Dry Ingredients
In a large mixing bowl, whisk together 2 cups of all-purpose flour, 2 cups of granulated sugar, ¾ cup of cocoa powder, 1 tablespoon of baking powder, and a pinch of salt. As you combine these dry ingredients, take in the rich chocolate aroma that fills the air; this sets the delightful base for your decadent Earthquake Cake.
Step 3: Combine the Wet Ingredients
In a separate bowl, mix 4 eggs, 1 cup of milk, and ½ cup of vegetable oil until well combined. Use a hand whisk or electric mixer on low speed for a smooth blend, ensuring the eggs are fully incorporated and creamy. This moisture-rich mixture will bring your cake to life, enhancing its fudgy texture.
Step 4: Combine Wet and Dry Ingredients
Gradually pour the wet mixture into the bowl with the dry ingredients, stirring gently until just combined. Be careful not to over-mix; a few lumps are perfectly fine. You want to keep that rich, intense chocolate flavor intact. As you pour, you’ll notice the batter becoming thick and glossy—just what you want for your Earthquake Cake.
Step 5: Pour Batter into the Pan
Transfer the batter into your prepared baking pan, smoothing the top with a rubber spatula. This layer will form the foundation of your Earthquake Cake, creating a fudgy base for the luscious cream cheese layer. Make sure the batter is evenly spread to bake uniformly, leading to a beautifully risen cake.
Step 6: Prepare the Cream Cheese Mixture
In a medium bowl, beat together 8 ounces of softened cream cheese, 1 cup of powdered sugar, and 1 teaspoon of vanilla extract until smooth and creamy. Use a hand mixer or whisk for an airy texture. The sweet, tangy filling will add a delicious contrast to the chocolate base of your Earthquake Cake.
Step 7: Add Cream Cheese Layer
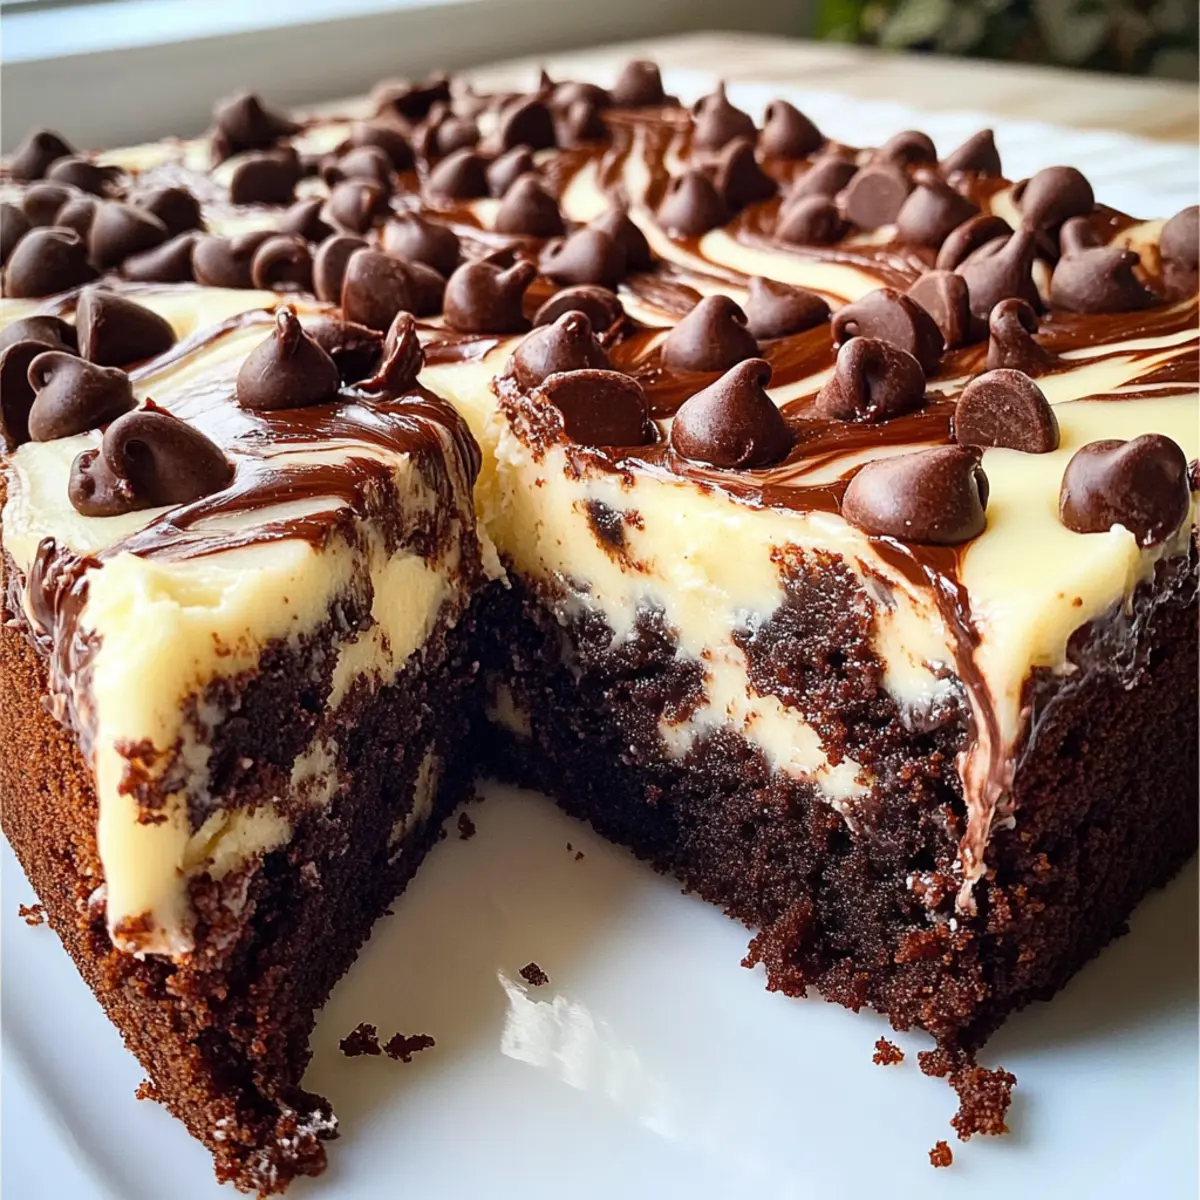
Dollop spoonfuls of the cream cheese mixture on top of the chocolate batter in the pan. Use a butter knife or skewer to swirl the filling into the batter gently. This swirling motion creates that beautiful and distinctive “earthquake” effect once baked, promising a delightful surprise with each slice of your cake.
Step 8: Add Toppings
Sprinkle 1 cup of chopped pecans or walnuts evenly across the top of your cake, followed by 1 cup of chocolate chips. The nuts will add delightful crunchiness, while the chocolate chips melt into the swirly cream cheese, enhancing the decadent experience of your Earthquake Cake.
Step 9: Bake the Cake
Place the baking pan in the preheated oven and bake for about 35-40 minutes. You’ll know the Earthquake Cake is ready when a toothpick inserted into the center comes out with a few moist crumbs. The top should be slightly cracked and puffed, inviting you to dive into its fudgy layers.
Step 10: Cool and Serve
Once baked, remove the cake from the oven and let it cool in the pan for 20 minutes before transferring it to a wire rack. This cooling period allows the Earthquake Cake to set a little, making it easier to cut into beautiful squares. Serve it warm or at room temperature to enjoy the full range of flavors.
Make Ahead Options
These Earthquake Cake preparations are perfect for busy home cooks looking to save time! You can prepare the cream cheese layer up to 24 hours in advance by mixing the softened cream cheese, powdered sugar, and vanilla extract, then refrigerating it in an airtight container to maintain its creamy texture. Additionally, you can mix the dry ingredients for the cake base (flour, sugar, cocoa powder, baking powder, and salt) and store them in a sealed container at room temperature for up to 3 days. When you’re ready to bake, simply combine the wet ingredients with the stored dry mixture, layer in the cream cheese, and bake as directed. This way, you’ll have a delectable Earthquake Cake ready with minimal last-minute effort, ensuring flavor and quality remain just as delicious!
Earthquake Cake Variations & Substitutions
Feel free to get creative and customize this Earthquake Cake to your liking, adding your own unique flair!
-
Nut-Free: Omit the pecans or walnuts entirely. This keeps the cake still delicious while catering to nut allergies. If you want a crunch, consider adding sunflower seeds for a delightful twist.
-
Dairy-Free: Swap the cream cheese with a dairy-free alternative, such as coconut cream. This will still provide a creamy texture while keeping it vegan-friendly. Adding a bit of nut milk will enrich the flavor even more.
-
Gluten-Free: Use a gluten-free chocolate cake mix instead of regular flour. This allows those with gluten sensitivities to indulge in this delightful dessert without worry. Just be sure to check that your other ingredients are also gluten-free.
-
Flavor Boost: Try adding a splash of espresso or coffee to the wet ingredients. This deepens the chocolate flavor, enhancing the overall richness of the cake. Your guests might be surprised by this special touch!
-
Coconut-Free: If you’d prefer a simpler flavor profile, leave out the coconut. This will allow the chocolate and cream cheese flavors to shine even more prominently.
-
Fruit Additions: Toss in a handful of berries or cherries before pouring the batter into the pan for a fruity surprise. The natural sweetness will balance nicely with the rich chocolate and creamy layer.
-
Spicy Kick: Add a pinch of cayenne pepper or chili powder to the chocolate batter for a subtle heat. This surprising element will make your Earthquake Cake truly memorable!
Don’t hesitate to experiment with these variations or mix and match ideas! If you’re further inspired to try other delightful treats, check out my collection of easy dessert recipes.
How to Store and Freeze Earthquake Cake
-
Room Temperature: Store the Earthquake Cake in an airtight container at room temperature for up to 3 days. This keeps the fudgy texture intact while allowing flavors to deepen.
-
Fridge: For longer freshness, cover the cake and refrigerate it for up to 5 days. Reheat individual slices in the microwave for about 15-20 seconds to enjoy warm.
-
Freezer: You can freeze leftover slices of Earthquake Cake wrapped tightly in plastic wrap and foil for up to 2 months. When ready to eat, let thaw in the fridge overnight or microwave for a quick treat.
-
Reheating: Reheat slices gently in the microwave for 15-20 seconds until warm, enhancing the gooey cream cheese swirls and chocolate goodness.
Expert Tips for Earthquake Cake
-
Know Your Measurements: Ensure you’re using a 15.25 oz chocolate cake mix for balanced flavors. Using a different size can affect texture and rise.
-
Room Temperature Ingredients: Allow cream cheese and eggs to reach room temperature before mixing. This prevents lumps in your cream cheese swirl and aids in even baking.
-
Swirl Gently: Avoid overmixing the cream cheese layer into the batter. A few distinct swirls make for a stunning presentation when baked.
-
Check for Doneness: Bake until just set—overbaking will dry out the cake. A toothpick should come out with a few moist crumbs still attached.
-
Cooling Time: Let the Earthquake Cake cool for at least 20 minutes before cutting. This allows it to set properly, making for cleaner slices.
-
Storing Leftovers: Keep any leftover cake in an airtight container at room temperature or in the fridge for up to five days. The flavors deepen over time!
What to Serve with Earthquake Cake
Imagine pairing this rich, fudgy Earthquake Cake with dishes that can elevate your dessert experience to new heights!
-
Vanilla Ice Cream: The creamy, cool contrast to the warm cake enhances the indulgent experience, making each bite truly divine.
-
Fresh Berries: Raspberries or strawberries add a tart freshness that balances the sweet, rich cake, creating a delightful harmony of textures and flavors.
-
Whipped Cream: A dollop of whipped cream adds airiness, allowing the dense cake texture to shine through while offering a touch of sweet elegance.
-
Caramel Sauce: Drizzle warm caramel on top for an additional layer of sweetness that complements the chocolate and nuttiness beautifully.
-
Espresso: A rich cup of coffee uplifts the flavors of chocolate; bitter notes make the cake’s sweetness pop even more.
-
Chopped Nuts: Serve with a sprinkle of toasted pecans or walnuts on top to add an extra crunch, enhancing the overall texture contrast.
-
Chocolate Ganache: For serious chocolate lovers, a warm chocolate ganache over the cake intensifies its richness, providing an indulgent finish.
-
Milkshake: A rich chocolate milkshake can create a nostalgic pairing, wrapping you in the comforting embrace of dessert.
This diverse selection ensures that every bite of your Earthquake Cake is complemented perfectly, enriching your homemade dessert adventure!
Earthquake Cake Recipe FAQs
What type of chocolate cake mix should I use?
For the best results, I recommend using a 15.25 oz box of chocolate cake mix. It provides the right balance of ingredients for a fudgy texture. Any standard chocolate mix will work, but sticking to this size ensures that the cake rises beautifully.
How can I tell if my Earthquake Cake is done baking?
You’ll know the cake is ready when a toothpick inserted into the center comes out with a few moist crumbs attached—this usually takes about 35-40 minutes. Keep an eye on it towards the end of the baking time; overbaking can lead to dryness.
Can I freeze leftover Earthquake Cake?
Absolutely! You can freeze individual slices of Earthquake Cake wrapped tightly in plastic wrap and foil for up to 2 months. To enjoy, let the slices thaw in the fridge overnight or microwave them gently for a warm treat.
How should I store the Earthquake Cake?
To keep the cake fresh, store it in an airtight container at room temperature for up to 3 days. If you prefer, you can refrigerate it for up to 5 days. Just be sure to reheat individual slices in the microwave for about 15-20 seconds to bring back its fudgy richness.
What if I have nut allergies?
If someone has nut allergies, simply omit the chopped pecans or walnuts from both the cake and the topping. You can substitute with ingredients like sunflower seeds for a similar texture without the allergen concerns, or simply leave it out for a nut-free dessert.
Can I use different toppings for my Earthquake Cake?
The more the merrier! You can absolutely switch out the nuts for alternatives like granola or coconut flakes, or add your favorite chocolate chunks. Mix and match to delight your taste buds; just keep the total topping to about 1 cup to not overwhelm the cake structure.
Decadent Earthquake Cake to Delight Your Taste Buds
Ingredients
Equipment
Method
- Preheat your oven to 350°F (175°C) and grease a 9x13 inch baking pan.
- In a large mixing bowl, whisk together the flour, sugar, cocoa powder, baking powder, and salt.
- In a separate bowl, mix the eggs, milk, and vegetable oil until well combined.
- Gradually pour the wet mixture into the dry ingredients, stirring gently until just combined.
- Transfer the batter into the prepared baking pan, smoothing the top.
- In a medium bowl, beat together the cream cheese, powdered sugar, and vanilla extract until smooth.
- Dollop spoonfuls of the cream cheese mixture onto the chocolate batter and swirl gently.
- Sprinkle chopped nuts and chocolate chips over the top of the mixture.
- Bake for about 35-40 minutes until a toothpick comes out with a few moist crumbs.
- Let cool in the pan for 20 minutes before transferring to a wire rack to finish cooling.
Leave a Reply