
As I stood in my kitchen, the rich, savory aroma of sizzling meat mingled with the sweet scent of caramelizing onions, instantly transporting me back to family dinners filled with laughter and heartwarming stories. This Classic Meatloaf recipe is a cherished tradition that not only warms the soul but also invites endless opportunities for creativity. You’ll love how this comforting dish can be tailored to fit your dietary needs, whether you prefer a hearty, classic version or a lighter, keto-friendly twist. With its simple prep and satisfying leftovers, this meatloaf is a perfect solution for busy weeknights and gatherings alike. Curious about how to make this beloved dish your own? Let’s dive in!

Why is This Meatloaf So Irresistible?
Comforting Flavors: This classic meatloaf is a warm hug on a plate, with a savory blend of ground beef, onion, and spices that creates a flavor profile everyone loves.
Healthy Variations: Looking to lighten things up? With easy ingredient swaps, like using ground turkey or incorporating finely grated veggies, you can enjoy a healthier meatloaf without losing the charm of the original recipe.
Quick Prep: Spend less time in the kitchen! This meatloaf comes together in just a few simple steps, making it perfect for busy weeknights.
Crowd-Pleasing Appeal: Whether it’s a family dinner or a potluck gathering, this dish is sure to please everyone. Plus, the leftovers are amazing in sandwiches or as a topping for pasta, reminiscent of my favorite Pesto Sauce Pasta.
Versatile Usage: You can easily customize this recipe to fit your meal planning needs, providing both a hearty meal and an array of wonderful leftovers.
Enjoy the beautiful balance of tradition and innovation with this classic meatloaf!
Classic Meatloaf Ingredients
Get ready to make an unforgettable classic meatloaf with these delicious ingredients!
For the Meatloaf
- Ground Beef – A hearty protein base; opt for 80-85% lean for the best flavor.
- Onion – This vegetable adds moisture and a touch of sweetness; chop it finely for even distribution.
- Eggs – Essential for binding the mixture together, ensuring a well-structured meatloaf.
- Milk – Keeps the meatloaf moist and tender; can be swapped with almond milk for a dairy-free version.
- Breadcrumbs – Adds texture; choose Panko for extra crunch or use crushed low-carb options for keto variations.
- Garlic – Pack in aromatic flavor; fresh is preferred, but garlic powder also works.
- Ketchup – Brings sweetness and moisture to the dish; consider low-sugar options or tomato paste mixed with vinegar for a healthier twist.
- Parsley – Adds freshness and color; feel free to omit if you’re in a pinch.
- Worcestershire Sauce – Provides a deep, savory flavor; soy sauce can be used as a substitute if needed.
- Seasonings (Salt, Black Pepper, Italian Seasoning) – Essential for enhancing the overall taste; adjust to suit your preference.
For the Glaze
- Ketchup – Use as a base for the glaze; it gives a sticky, sweet finish.
- Brown Sugar – Adds sweetness; adjust the amount for a healthier option!
- White Vinegar – Balances the sweetness of the glaze; consider apple cider vinegar for a fruity twist.
- Garlic Powder & Onion Powder – These enhance the flavor profile of the glaze; feel free to adjust based on taste.
With these ingredients, you’re all set to create a classic meatloaf that your whole family will adore!
Step‑by‑Step Instructions for Classic Meatloaf
Step 1: Preheat and Prepare
Begin by preheating your oven to 350°F (175°C). While the oven warms, line a loaf pan with foil or lightly grease a baking sheet for easy cleanup. This preparation ensures even cooking and prevents sticking, making it easier to enjoy your classic meatloaf once it’s done.
Step 2: Mix the Ingredients
In a large mixing bowl, combine the ground beef, finely chopped onion, eggs, milk, breadcrumbs, minced garlic, 1/4 cup of ketchup, parsley, Worcestershire sauce, salt, black pepper, and Italian seasoning. Use your hands to blend the mixture gently until just combined, avoiding overmixing to keep the meatloaf tender and moist.
Step 3: Shape the Mixture
Transfer the meat mixture onto your prepared loaf pan or baking sheet. Shape it into a loaf, ensuring it’s evenly formed to promote even cooking. This classic meatloaf should have a smooth surface, allowing for better glazing later in the cooking process.
Step 4: Prepare the Glaze
In a separate small bowl, whisk together the glaze ingredients: ketchup, brown sugar, white vinegar, garlic powder, and onion powder. This mixture will enhance the flavor and provide a beautiful sticky finish to your classic meatloaf, so make sure it’s well blended.
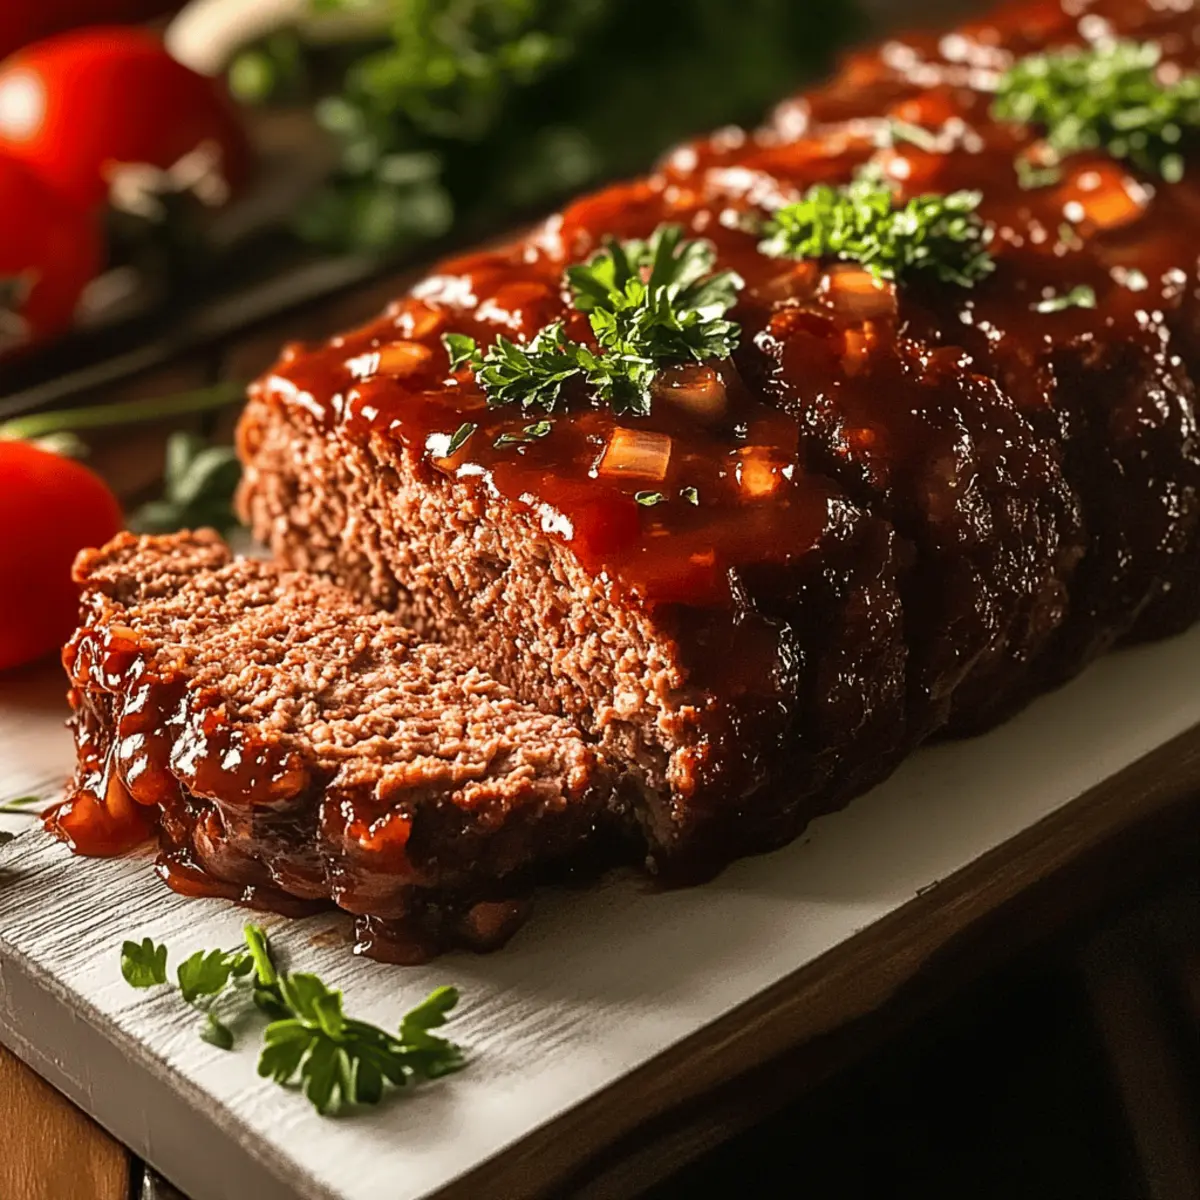
Step 5: Apply the Glaze
Using a brush or spoon, evenly spread half of your glaze mixture over the top of the shaped meatloaf. This step not only adds flavor but also creates a shiny, appetizing finish. The tempting aroma will begin to fill your home as it bakes!
Step 6: Bake the Meatloaf
Place the meatloaf in the preheated oven and bake for 45 minutes. After this initial cooking time, check the internal temperature; it should start to approach 160°F (71°C). Brush the meatloaf with the remaining glaze and continue baking for an additional 15 to 30 minutes, until thoroughly cooked and caramelized.
Step 7: Let It Rest
Once your classic meatloaf has reached the desired temperature, remove it from the oven and let it rest for 10-15 minutes. This allows the juices to redistribute, ensuring each slice remains moist and flavorful. It’s a crucial step you won’t want to skip!
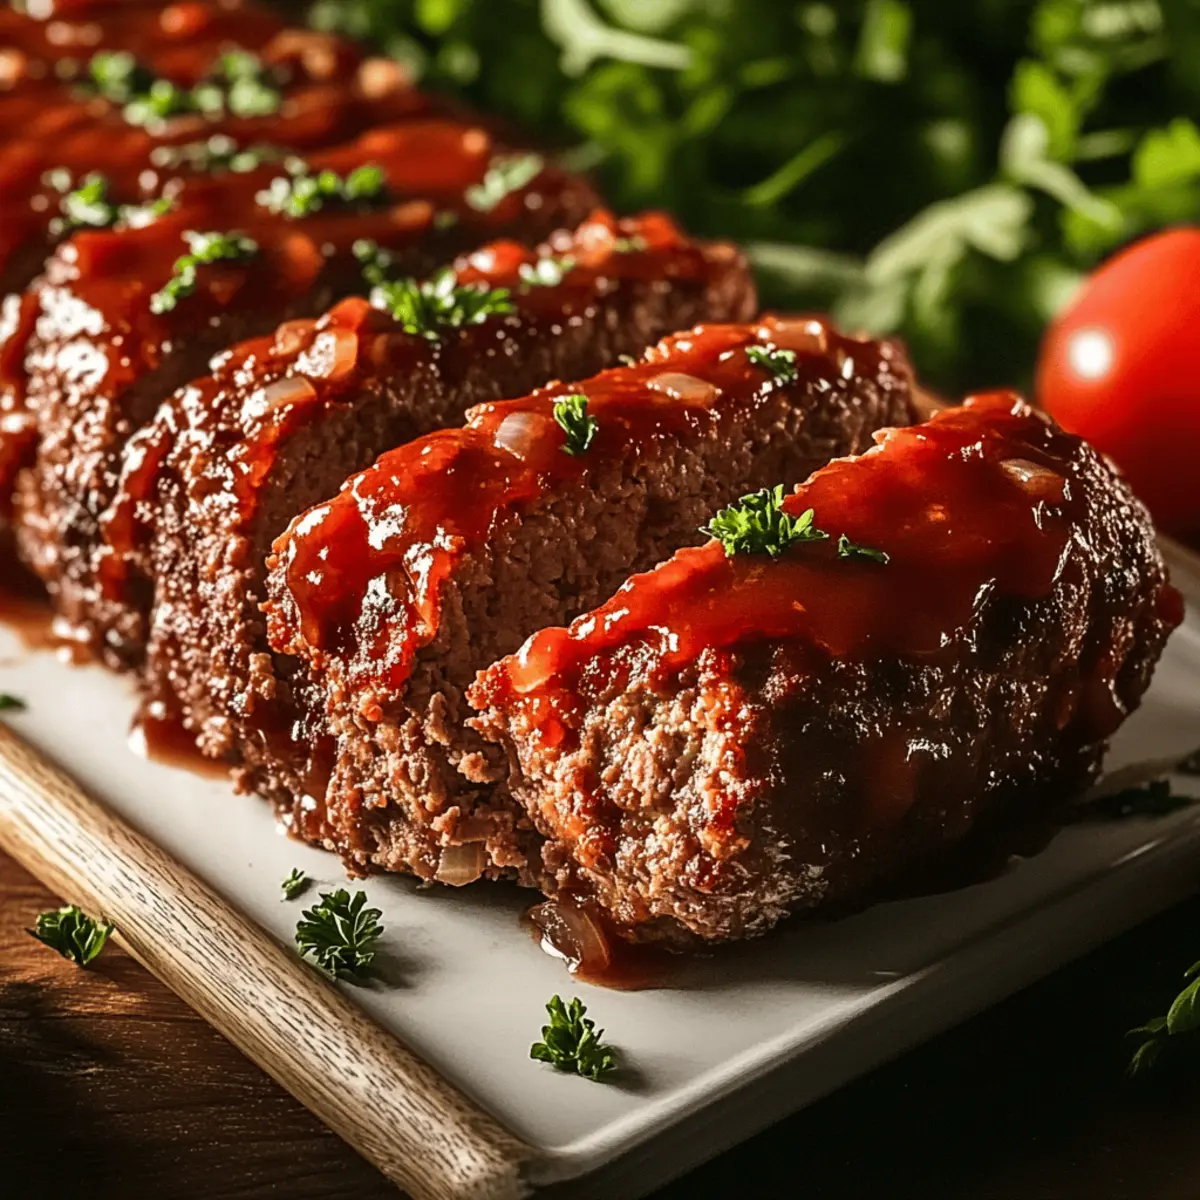
Step 8: Slice and Serve
After the resting period, carefully slice the meatloaf into portions. Serve it warm with your favorite sides, like mashed potatoes or green beans, for a comforting meal. This classic meatloaf is not only delicious but also perfect for leftovers in sandwiches or pasta dishes.
What to Serve with Classic Meatloaf
Cozy up your dinner table with delightful pairings that enhance the comforting magic of meatloaf.
- Creamy Mashed Potatoes: Smooth and buttery, these fluffy potatoes balance the savory richness of meatloaf, creating a classic comfort food experience.
- Garlicky Green Beans: Tender green beans sautéed with garlic add a pop of freshness and crunchy texture, complementing the hearty flavors perfectly.
- Garden Salad: A crisp salad with mixed greens and a tangy vinaigrette cuts through the richness of meatloaf, refreshing the palate between bites.
- Roasted Vegetables: Mixed veggies roasted to caramelized perfection bring vibrant colors and a hint of sweetness, adding a delicious contrast to the savory dish.
- Baked Sweet Potatoes: Their natural sweetness pairs beautifully with the savory meatloaf, creating a balanced flavor profile that feels satisfying and wholesome.
- Homemade Biscuits: Fluffy, buttery biscuits are perfect for mopping up any leftover glaze on your plate, adding a touch of indulgence to the meal.
- Coleslaw: A crunchy coleslaw offers a zesty crunch that helps to lighten the rich flavors of classic meatloaf, making for a delightful side.
- Red Wine: A glass of bold red wine enhances the meatloaf’s savoriness, making your dinner feel even more special.
- Chocolate Cake: End the meal on a sweet note with a slice of rich chocolate cake, embracing the classic comfort of home-cooked dinners.
Make Ahead Options
These Classic Meatloaf preparations make for an ideal meal prep solution for busy weeknights! You can assemble the meatloaf mixture and refrigerate it for up to 24 hours before baking, allowing the flavors to meld beautifully. Alternatively, you can shape the meatloaf, cover it tightly with foil, and freeze it for up to 3 months. To maintain quality, be sure to wrap it securely to prevent freezer burn. When you’re ready to cook, simply thaw overnight in the refrigerator and bake as directed, adding a few extra minutes to the baking time if it’s still a bit chilled. This way, you’ll enjoy a homemade meal with minimal effort, just as delicious as when you first made it!
How to Store and Freeze Classic Meatloaf
Fridge: Store cooked classic meatloaf in an airtight container in the fridge for up to 3 days. Just make sure it cools completely before sealing for optimal freshness.
Freezer: Wrap the meatloaf tightly in plastic wrap, then in aluminum foil or place it in a freezer-safe container. It can be frozen for up to 3 months, perfect for future meals!
Reheating: To reheat, thaw overnight in the fridge, then warm in the oven at 350°F (175°C) for about 20-25 minutes, or until heated thoroughly, preserving its delicious taste.
Make-Ahead: Feel free to prepare the classic meatloaf up to 2 days in advance before baking. Just cover and refrigerate until you’re ready to pop it in the oven; your meal planning just got easier!
Classic Meatloaf Variations & Substitutions
Customize this beloved classic meatloaf to fit your unique tastes and dietary preferences—let your creativity shine!
- Ground Turkey: Swap ground beef for lean ground turkey to cut down on fat while keeping flavor intact. It’s wonderfully moist and delicious!
- Almond Flour: Use almond flour instead of breadcrumbs for a satisfying keto-friendly texture that won’t compromise flavor. You’ll love this nutty twist!
- Veggie Boost: Add finely grated carrots, zucchini, or bell peppers to the meat mixture for extra nutrients. This not only enhances nutrition but also adds a delightful pop of color and texture.
- Low-Sugar Ketchup: Opt for low-sugar ketchup or even homemade tomato paste mixed with vinegar to reduce sugar content while still getting that sweet-savory finish.
- Spicy Kick: If you’re craving some heat, mix in crushed red pepper flakes or diced jalapeños. This spicy variation will tantalize your taste buds in the coziest way!
- Dairy-Free Option: Swap regular milk for almond or oat milk to make the recipe dairy-free without losing moisture or creaminess. It’s an easy solution for those with dietary restrictions.
- Herb Infusion: Experiment with fresh herbs like thyme or rosemary in place of parsley for a fresh twist that brings an aromatic flair to your classic meatloaf.
- Meat Blend: Combine ground beef with ground pork for an ultra-flavorful meatloaf that has a unique depth. It’s a family favorite at our gatherings!
Feel free to explore these variations, and find delightful ways to make this classic dish truly your own. For more inspiration on delicious pairings, try serving it alongside my favorite Pesto Sauce Pasta, and enjoy every comforting bite!
Expert Tips for Classic Meatloaf
• Avoid Overmixing: Gently combine the ingredients to keep the meatloaf tender and moist. Overmixing can lead to a tough texture that’s less enjoyable.
• Rest Before Slicing: Letting the meatloaf rest after baking is essential for redistributing juices, preventing dry slices. Don’t skip this step if you want maximum flavor!
• Customize Vegetables: Add finely chopped veggies like carrots or zucchini into the meat mixture for extra nutrition and a boost of flavor without altering the classic meatloaf taste.
• Glaze it Right: Apply half the glaze before baking and reserve the rest for a second application. This ensures a beautifully caramelized finish and layers of flavor in your classic meatloaf.
• Check Internal Temperature: Use a meat thermometer to ensure the meatloaf reaches at least 160°F (71°C) for safe consumption. This eliminates the guesswork!

Classic Meatloaf Recipe FAQs
How do I choose the right ground beef?
Absolutely! For the best flavor and moisture, I recommend using ground beef with an 80-85% lean-to-fat ratio. This balance ensures that your classic meatloaf is juicy without being overly greasy. Avoid meat with excessive dark spots, which may indicate spoilage.
What’s the best way to store leftover meatloaf?
Very good question! Store your cooked classic meatloaf in an airtight container in the refrigerator for up to 3 days. Be sure to allow it to cool completely before sealing, which helps maintain its freshness and flavor. You can reheat slices in the microwave or in the oven at 350°F (175°C) until warmed through.
Can I freeze my classic meatloaf for later?
Definitely! To freeze your classic meatloaf, first allow it to cool completely. Then, wrap it tightly in plastic wrap followed by aluminum foil or place it in a freezer-safe container to prevent freezer burn. It will keep well for up to 3 months. When you’re ready to enjoy it again, simply thaw it in the fridge overnight and reheat as desired.
What if my meatloaf is dry?
If your classic meatloaf turns out dry, it may be due to overmixing the ingredients or cooking it for too long. To combat this, mix just until combined and avoid overbaking. If you find yourself needing more moisture, you can serve it with extra ketchup or a homemade sauce. Additionally, adding finely chopped veggies, like zucchini or carrots, can introduce extra moisture and enhance flavor!
Are there any dietary considerations for this recipe?
Yes, indeed! If you’re accommodating allergies or dietary needs, you can easily make the classic meatloaf gluten-free by using gluten-free breadcrumbs or almond flour instead. For lactose intolerance, substitute traditional milk with almond milk. Always check the labels on sauces and condiments like Worcestershire to ensure they meet your dietary requirements.
Can pets enjoy classic meatloaf?
While a small piece of plain meatloaf without glaze can be a tasty treat for dogs, it’s important to avoid letting them consume any ingredients that are harmful, like onions and garlic. Always consult your veterinarian before sharing human food with pets to keep them safe!
Classic Meatloaf with a Healthy Twist That's Simply Comforting
Ingredients
Equipment
Method
- Preheat your oven to 350°F (175°C) and prepare a loaf pan.
- In a large mixing bowl, combine the ground beef, onion, eggs, milk, breadcrumbs, garlic, 1/4 cup ketchup, parsley, Worcestershire sauce, salt, pepper, and Italian seasoning.
- Transfer the mixture to the prepared loaf pan and shape it into a loaf.
- In a separate bowl, mix the glaze ingredients: ketchup, brown sugar, white vinegar, garlic powder, and onion powder.
- Spread half of the glaze over the meatloaf.
- Bake for 45 minutes, then brush with the remaining glaze and bake for an additional 15-30 minutes.
- Let the meatloaf rest for 10-15 minutes before slicing.
- Serve warm with your favorite sides.
Leave a Reply