
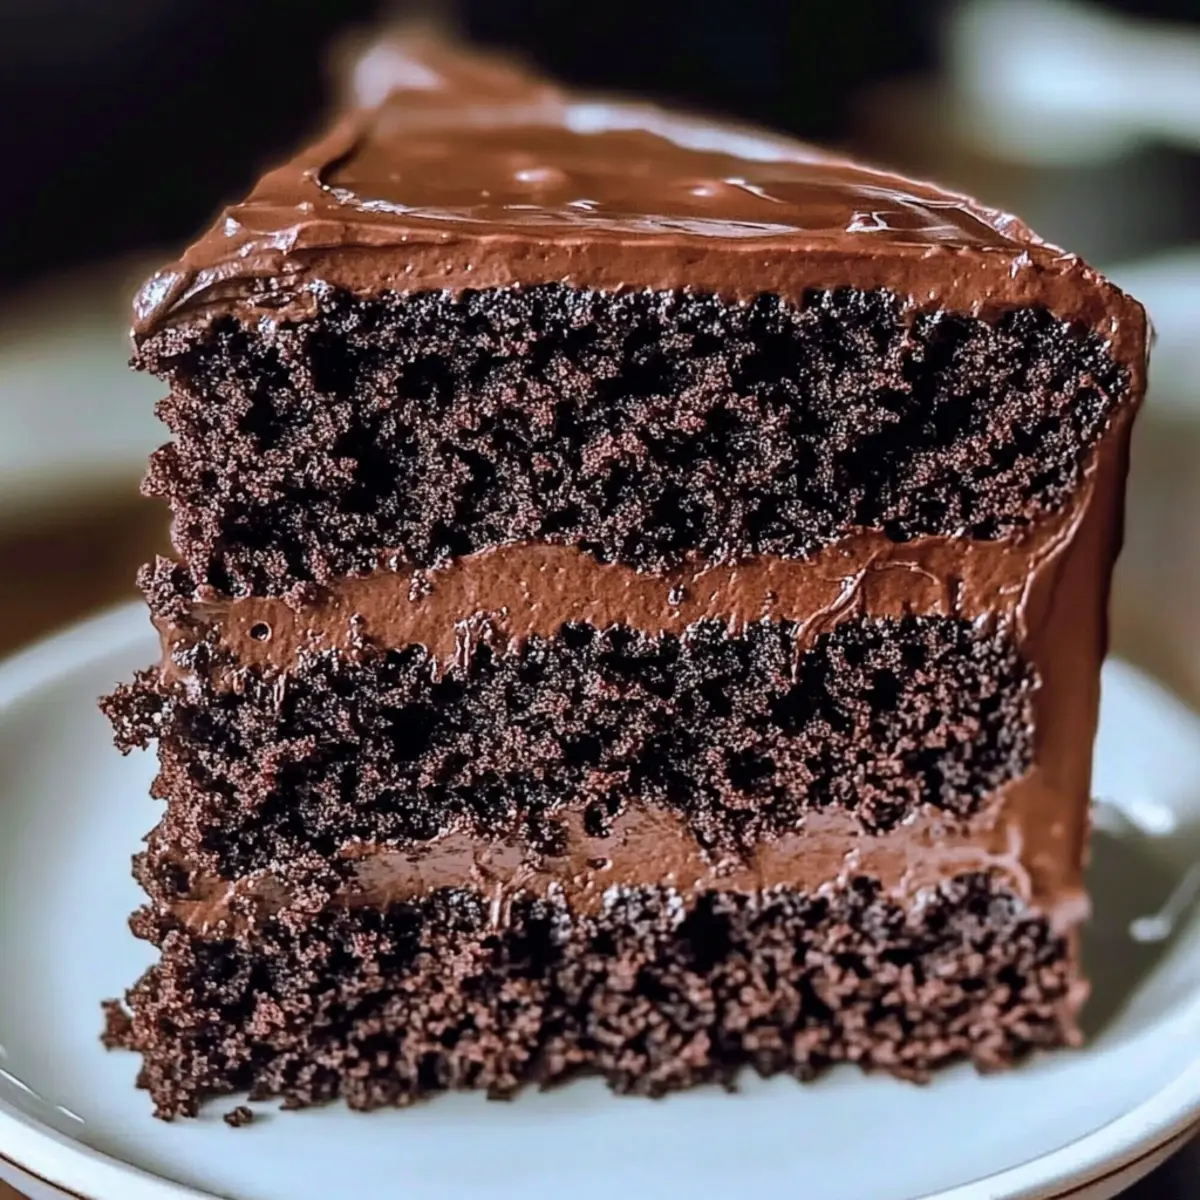
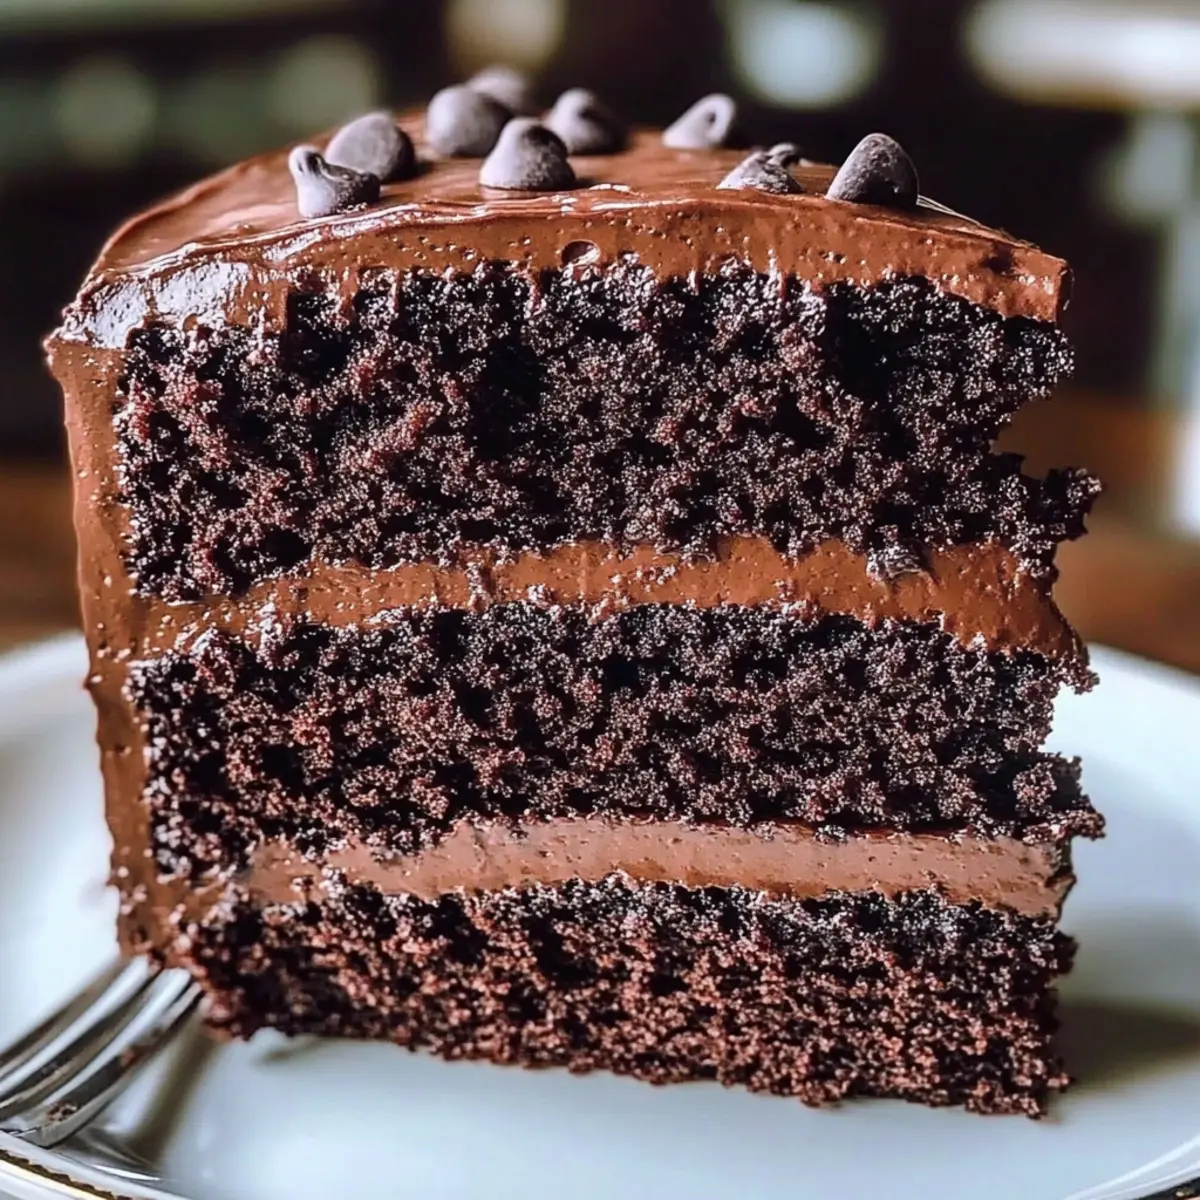
As I whisk together layers of rich cocoa and smooth melted chocolate, memories of childhood dreams come flooding back to me. This ultra-moist Matilda Chocolate Cake, inspired by the heartwarming scene from the beloved film, brings back that magical feeling of indulgence. Perfect for creating cherished moments, this cake not only looks stunning with its glossy ganache but also boasts a delightful mix of textures in every bite. With a preparation time that won’t keep you in the kitchen for hours and a flavor that’s sure to impress all your friends and family, it’s an unforgettable centerpiece for any celebration. Have you ever tasted a cake that feels like a warm hug? Let’s dive into the recipe together!

Why is this Matilda Cake so special?
Ultra-Moist Texture: This cake’s secret lies in its combination of buttermilk and melted chocolate, ensuring each slice is heavenly and moist.
Rich Chocolate Flavor: With dark chocolate and Dutch-processed cocoa, every bite transports you to chocolate paradise, evoking nostalgia from the iconic film.
Quick and Easy Preparation: No need to spend hours in the kitchen! This cake comes together effortlessly, allowing you to focus on making magical memories.
Crowd-Pleasing Delight: Perfect for birthdays or gatherings, it attracts guests like a magnet, making you the star of every celebration.
Gorgeous Presentation: Drizzled with glossy ganache, this cake not only tastes divine but looks stunning, ensuring it’s the centerpiece that impresses everyone.
For a delightful pairing, consider serving this cake alongside a scoop of vanilla ice cream or whipped cream. If you’re in the mood for more sweet inspiration, check out my Double Chocolate Zucchini or Butter Pumpkin Chocolate recipes!
Matilda Chocolate Cake Ingredients
• To create the ultimate indulgence with this Matilda Chocolate Cake, gather these essential ingredients!
For the Cake
- Dark Chocolate – High-quality chocolate, chopped; ensures rich chocolate flavor essential for moistness and depth—aim for 60-70% cocoa content.
- Dutch-Processed Cocoa Powder – Sifted cocoa powder that adds chocolate intensity and deep color; remember to sift to prevent lumps.
- All-Purpose Flour – Standard flour providing structure; for a gluten-free version, substitute with a gluten-free blend.
- Granulated Sugar – Sweetens the cake and contributes to moisture.
- Light Brown Sugar – Packed sugar that adds a subtle caramel note and moisture.
- Unsalted Butter – At room temperature for tender crumb; avoid cold butter to ensure the cake’s texture holds up.
- Large Eggs – Room temperature helps with proper emulsification for a stable batter.
- Buttermilk – Room temperature for added moisture; you can use yogurt as a substitute if needed.
- Baking Soda & Baking Powder – Essential leavening agents that help the cake rise; always check expiration for effectiveness.
- Espresso Powder – Optional, enhances the overall chocolate flavor.
- Pure Vanilla Extract – Adds aromatic flavor depth; consider using homemade extract for the best results.
- Salt – Balances sweetness and enhances overall flavor.
- Semi-Sweet Chocolate Chips – Folded in for added texture and delicious bursts of chocolate throughout.
For the Ganache
- Heavy Cream – Heated until just simmering, it’ll create a smooth ganache when combined with chocolate.
- Chopped Dark Chocolate – Mixed with heavy cream to create a silky ganache layer; opt for high-quality chocolate for the best result.
- Unsalted Butter – Stirred in for a glossy finish that elevates the ganache to a whole new level.
Now that you have all the flavorful components for your Matilda Chocolate Cake, let’s get baking and create a memorable masterpiece!
Step‑by‑Step Instructions for Matilda Chocolate Cake
Step 1: Preheat and Prepare
Begin by preheating your oven to 350°F (175°C). While it heats, take two 9-inch round cake pans and line them with parchment paper, ensuring the paper fits snugly in the bottom. Lightly grease the pans with unsalted butter to prevent sticking. This initial setup is crucial for your Matilda Chocolate Cake to bake evenly.
Step 2: Melt the Dark Chocolate
In a microwave-safe bowl or a double boiler, gently melt the chopped dark chocolate. Heat in 30-second increments in the microwave, stirring in between, until the chocolate is smooth and completely melted. Allow the melted chocolate to cool slightly before adding it to the batter, ensuring it doesn’t cook the eggs when mixed in.
Step 3: Cream the Butter and Sugars
In a large mixing bowl, combine room temperature unsalted butter, granulated sugar, and light brown sugar. Using a hand mixer or stand mixer, cream these together on medium speed for about 3 minutes, until the mixture is light and fluffy. This process is important as it introduces air for a tender and moist Matilda Chocolate Cake.
Step 4: Incorporate the Eggs and Vanilla
Add the large eggs to the creamed butter mixture, one at a time. Beat well after each addition to ensure they are fully incorporated. Next, stir in the pure vanilla extract. Mixing these ingredients thoroughly will create a rich, flavorful base for your chocolate cake.
Step 5: Add the Melted Chocolate
Once the eggs and vanilla are well combined, pour in the cooled melted chocolate. Mix on low speed until the chocolate is completely incorporated, creating a smooth, decadent batter. This step is vital, as the chocolate will deepen the flavor of your Matilda Chocolate Cake.
Step 6: Combine the Dry Ingredients
In a separate bowl, whisk together the all-purpose flour, sifted Dutch-processed cocoa powder, baking soda, baking powder, espresso powder, and salt. This step helps to aerate the dry ingredients and ensure even distribution, preventing lumps and creating a uniform texture in your cake batter.
Step 7: Mix the Wet and Dry Ingredients
Gradually add the dry ingredient mixture to the wet ingredients, alternating with the buttermilk. Start and end with the dry ingredients, mixing until just combined. Be careful not to overmix, as this can lead to a dense cake. The final batter should be rich and glossy, embodying the essence of the Matilda Chocolate Cake.
Step 8: Fold in Chocolate Chips
Gently fold in the semi-sweet chocolate chips using a spatula. This adds delightful bursts of chocolate throughout the cake, enhancing its texture and flavor. Ensure that the chocolate chips are evenly distributed throughout the batter without overworking it.
Step 9: Bake the Cakes
Divide the batter evenly between the prepared cake pans, smoothing the tops with a spatula. Place them in the preheated oven and bake for 30-35 minutes. Check for doneness by inserting a toothpick into the center; it should come out with a few moist crumbs attached but not completely wet.
Step 10: Cool the Cakes
Once baked, remove the cakes from the oven and allow them to cool in the pans for about 10 minutes. Carefully transfer the cakes onto wire racks to cool completely. This cooling process is essential to prevent the ganache from melting, which you’ll be adding later to your Matilda Chocolate Cake.
Step 11: Prepare the Ganache
To create the glossy ganache, heat the heavy cream in a saucepan until it just begins to simmer. Pour the hot cream over the chopped dark chocolate in a separate bowl, letting it sit for a minute before stirring until smooth. Add in a tablespoon of unsalted butter and a splash of vanilla extract for extra richness.
Step 12: Assemble the Cake
To assemble your Matilda Chocolate Cake, place one layer on a serving plate. Spread a generous amount of ganache on top, then carefully place the second layer over it. Drizzle the remaining ganache over the top, allowing it to elegantly drip down the sides for a stunning finish.
Matilda Chocolate Cake Variations
Get ready to explore delightful options that elevate your cake experience and satisfy all chocolate lovers!
- Gluten-Free: Swap all-purpose flour with a gluten-free flour blend to make this cake accessible for everyone.
- Nutty Crunch: Add ½ cup of chopped walnuts or pecans for delightful crunch and a hint of earthiness in every bite.
- Extra Chocolate: Use a mix of dark and white chocolate for the ganache to create a beautiful contrast and sweetness.
- Berry Bliss: Layer in fresh raspberries or strawberries between cake layers for a burst of fruity freshness that complements the chocolate.
- Dairy-Free: Substitute buttermilk with almond milk and use coconut oil instead of butter for a deliciously creamy, dairy-free treat.
- Coffee Kick: Enhance the chocolate with an extra tablespoon of espresso powder for a richer flavor that coffee lovers will adore.
- Lemon Zest: Add a teaspoon of lemon zest to the batter for a surprising citrus note that brightens the deep chocolate flavor.
- Caramel Drizzle: Finish with a homemade or store-bought caramel sauce over the ganache for an indulgent, sweet twist.
Explore these variations to create your own signature Matilda Chocolate Cake that will transport you back to the unforgettable moments of childhood! If you’re looking for more chocolate inspiration, don’t miss my recipes for delightful Coffee Cake Muffins or the dreamy Almond Flour Cake – perfect additions to any dessert table!
Expert Tips for Matilda Chocolate Cake
Room Temperature Matters: Make sure all your ingredients, especially butter and eggs, are at room temperature to achieve a smooth batter and even baking.
Sift Cocoa Powder: Always sift your Dutch-processed cocoa powder to prevent lumps, ensuring a silky, smooth cake that melts in your mouth.
Quality Chocolate First: Invest in high-quality dark chocolate; it significantly impacts the flavor and richness of your Matilda Chocolate Cake.
Don’t Rush the Cooling: Allow your layers to cool completely before adding ganache. This prevents the icing from melting and keeps your cake beautifully layered.
Check for Doneness: Use the toothpick test! Insert it in the center of the cake; it should come out with a few moist crumbs, not wet batter.
Chill the Ganache: Allow your ganache to cool a bit before pouring it over the cake. This creates the perfect runny yet glossy finish.
How to Store and Freeze Matilda Chocolate Cake
Room Temperature: Store leftover cake in an airtight container at room temperature for up to 3 days. This keeps the cake moist and delicious for enjoying daily!
Fridge: For extended freshness, refrigerate the cake in an airtight container. It can last up to 1 week, preserving its rich flavors while maintaining moisture.
Freezer: If you want to savor this indulgence later, wrap slices tightly in plastic wrap and then place them in a freezer-safe bag. The Matilda Chocolate Cake can freeze for up to 3 months.
Reheating: When ready to enjoy, let it thaw overnight in the fridge, then warm slices in the microwave for about 10-15 seconds, just to bring back that freshly-baked taste!
Make Ahead Options
These Matilda Chocolate Cakes are perfect for busy home cooks looking to save time without skimping on flavor! You can prepare the cake layers up to 24 hours in advance; simply bake them, allow them to cool completely, and then wrap each layer tightly in plastic wrap before refrigerating. The ganache can also be made ahead of time and stored in the refrigerator for 3 days. When you’re ready to serve, simply reheat the ganache gently until it’s pourable, then assemble your cake and let it sit at room temperature for about 30 minutes to ensure it’s just as delicious as when freshly made. These prep-ahead options mean you can enjoy heartfelt moments with your loved ones while presenting a stunning dessert without the last-minute rush!
What to Serve with Ultra-Moist Triple Chocolate Matilda Cake?
Indulging in this rich chocolate delight invites you to create a full spread of flavors and textures that elevate your dessert experience.
- Vanilla Ice Cream: Creamy and cool, it perfectly contrasts the cake’s richness and enhances its chocolate flavor.
- Fresh Berries: Raspberries or strawberries add a fruity tartness, cutting through the cake’s sweet density with a refreshing twist.
- Whipped Cream: Light and fluffy, it complements the fudgy texture while offering a delightful dollop of sweetness to every slice.
- Chocolate Sauce: For true chocolate lovers, drizzling extra chocolate sauce will amplify the cocoa experience and please the sweet tooth.
- Coffee: A cup of rich, dark coffee accentuates the chocolate notes, making each bite taste even more luxurious and satisfying.
- Milk: A classic pairing, a glass of cold milk softens the rich flavors, making each bite feel like a comforting home moment.
- Chocolate Mousse: Serve alongside a small bowl of airy chocolate mousse for a double chocolate delight that impresses guests.
- Nutty Biscotti: Crunchy and lightly sweet with a nutty flavor, biscotti offers a perfect dip to enjoy alongside your cake.
- Sour Cream Topping: A dollop of tangy sour cream balances the sweetness, creating a unique flavor profile that surprises and delights.
Matilda Chocolate Cake Recipe FAQs
What type of chocolate should I use for the best results?
Absolutely! For the best flavor and richness in your Matilda Chocolate Cake, I recommend using high-quality dark chocolate that has a cocoa content of 60-70%. This balance will impart the rich chocolate flavor while keeping the cake moist.
How can I store my baked Matilda Chocolate Cake?
To keep your cake fresh, store it in an airtight container at room temperature for up to 3 days. If you need to keep it longer, refrigerate it in an airtight container where it will remain delicious for up to 1 week.
Can I freeze leftover slices of Matilda Chocolate Cake?
Very! To freeze, first wrap individual slices tightly in plastic wrap and then place them in a freezer-safe bag. This allows you to enjoy this scrumptious cake for up to 3 months. When you’re ready to indulge, simply thaw overnight in the fridge, then warm it in the microwave for a few seconds for that freshly-baked feel.
What should I do if my cake comes out too dense?
If your cake turns out denser than expected, it could be due to overmixing the batter or not incorporating enough air while creaming the butter and sugars. To prevent this, make sure your butter is at room temperature and mix just until combined. Also, ensure you’re measuring your flour correctly—too much can lead to a heavier cake!
Are there any allergy considerations I should be aware of?
Certainly! This Matilda Chocolate Cake contains common allergens like eggs, dairy, and wheat. For a gluten-free version, you can substitute the all-purpose flour with a gluten-free flour blend. If you’re looking for dairy-free options, try using coconut milk or almond milk instead of buttermilk and substitute butter with a plant-based alternative.
How do I know when my cake is perfectly baked?
You can check for doneness by inserting a toothpick in the center of the cake. If it comes out with a few moist crumbs attached, your Matilda Chocolate Cake is ready! Be careful not to overbake, as this can lead to a dry texture.

Decadent Matilda Chocolate Cake to Delight Your Taste Buds
Ingredients
Equipment
Method
- Preheat your oven to 350°F (175°C) and prep two 9-inch round cake pans by lining them with parchment paper and greasing them with unsalted butter.
- In a microwave-safe bowl, melt the chopped dark chocolate gently, then allow to cool slightly.
- Cream room temperature unsalted butter with granulated sugar and light brown sugar until light and fluffy.
- Incorporate large eggs one at a time, beating well after each addition, then stir in the pure vanilla extract.
- Add the cooled melted chocolate to the creamed mixture and blend on low speed until combined.
- In another bowl, whisk together all-purpose flour, Dutch-processed cocoa powder, baking soda, baking powder, espresso powder, and salt.
- Gradually mix the dry ingredients into the wet mixture, alternating with buttermilk.
- Fold in semi-sweet chocolate chips, ensuring even distribution.
- Divide batter between prepared pans and bake for 30-35 minutes; check doneness with a toothpick.
- Cool the cakes in pans for 10 minutes before transferring to a wire rack to cool completely.
- Heat heavy cream until simmering, then mix it with chopped dark chocolate to form ganache; stir in butter.
- Assemble the cake by layering with ganache between the cake layers and drizzling remaining ganache on top.
Leave a Reply