
As I stood over the sizzling pan, a sizzle and a crunch filled the air, transporting me straight to a bustling izakaya in Japan. Japanese Katsu Bowls with Tonkatsu Sauce have become a household favorite, offering comfort and satisfaction with each bite. In this recipe, crispy Chicken Katsu pairs beautifully with fluffy rice and vibrant, fresh veggies, all drizzled with a rich, tangy sauce that makes everything sing. With quick prep and endless variations—perfect for busy weeknights or impressing guests—this dish serves up hearty flavors that truly resonate. Have you ever craved something that feels like a warm hug on a plate? Let’s craft that Katsu experience together!
Why is Katsu So Irresistibly Delicious?
Satisfying crunch: The first bite reveals a delightful crispy exterior, which contrasts perfectly with the juicy, tender chicken inside.
Endless variations: Whether you choose chicken, pork, or even tofu, this recipe adapts effortlessly to fit any preference.
Quick and simple: With just a few ingredients and straightforward steps, you can whip this comforting dish together in under an hour.
Crowd-pleaser: Perfect for family dinners or entertaining guests, your loved ones will rave about this delicious meal.
Nutrient-packed: Top it with vibrant veggies to not only enhance the flavor but also boost the nutrition of your meal—a win-win!
Don’t forget to try pairing it with a warm Bean Bacon Soup for an even cozier evening!
Japanese Katsu Bowls Ingredients
Get ready to create a dish that will bring the flavors of Japan right to your kitchen!
For the Chicken Katsu
- Chicken Breasts – Boneless and skinless pieces ensure even cooking and tenderness.
- Salt and Black Pepper – Essential for enhancing the chicken’s natural flavor; season generously.
- All-Purpose Flour – A base for your coating; substitute with gluten-free flour if needed.
- Large Eggs – Helps panko adhere to the chicken, forming a crispy crust.
- Panko Breadcrumbs – Provides a light, crunchy coating; you can also use regular breadcrumbs for a different texture.
- Vegetable Oil – Use for frying; canola or peanut oil are great substitutes.
For the Tonkatsu Sauce
- Ketchup – Acts as the base, adding sweetness and tang to your sauce.
- Worcestershire Sauce – Contributes depth and a savory umami flavor.
- Soy Sauce – A crucial ingredient; opt for gluten-free soy sauce for a gluten-free version.
- Sugar – Balances the acidity of the sauce; feel free to adjust to taste.
- Mirin – Adds a hint of sweetness; if unavailable, replace with sake and sugar.
- Dijon Mustard – Enhances sauce flavor; optional but highly recommended.
- Garlic Powder – Adds a warm, aromatic touch to your sauce; optional but adds depth.
For the Katsu Bowl
- Cooked White Rice – The perfect base; short-grain rice maintains a sticky texture.
- Shredded Cabbage – Adds color, crunch, and nutrition; a classic topping for Katsu bowls.
- Sliced Cucumber – For refreshing crunch; consider using pickled cucumbers for extra flavor.
- Sliced Radishes and Carrots – Enhance the bowl with vibrant colors and additional nutrients.
- Chopped Green Onions and Sesame Seeds – Use these as garnishes for flavor and beautiful presentation.
Prepare your ingredients, and let’s dive into crafting these delightful Japanese Katsu Bowls with Tonkatsu Sauce!
Step‑by‑Step Instructions for Japanese Katsu Bowls with Tonkatsu Sauce
Step 1: Prepare the Chicken
Begin by pounding the boneless, skinless chicken breasts to an even ½ inch thickness using a meat mallet, ensuring they will cook evenly. Season both sides generously with salt and black pepper for enhanced flavor. This tender preparation is key to achieving juicy chicken katsu in your bowls.
Step 2: Set Up Your Breading Station
Create a convenient breading station with three shallow bowls. Fill the first with all-purpose flour, the second with beaten eggs, and the third with panko breadcrumbs. This organized setup will help you coat the chicken efficiently, leading to perfectly crispy Chicken Katsu for your Japanese Katsu Bowls.
Step 3: Coat the Chicken
Take a piece of seasoned chicken and first coat it in the flour, tapping off any excess. Next, dip it into the egg wash, letting any extra drip off. Finally, press the chicken into the panko breadcrumbs, ensuring a thick, even coating. Repeat this process until all chicken pieces are breaded.
Step 4: Heat the Oil
In a large frying pan, pour in enough vegetable oil to create a shallow layer, about ¼ inch deep. Heat the oil over medium-high heat until it shimmers, indicating it’s hot enough for frying. This step is crucial, as the right temperature ensures a crisp texture and prevents the katsu from becoming greasy.
Step 5: Fry the Chicken Katsu
Carefully place the breaded chicken pieces in the hot oil, being mindful not to overcrowd the pan. Fry each piece for 4–5 minutes on one side until golden brown. Then, gently flip them over using tongs and cook for an additional 4–5 minutes, ensuring they reach an internal temperature of 165°F (74°C).
Step 6: Make the Tonkatsu Sauce
In a mixing bowl, combine ketchup, Worcestershire sauce, soy sauce, sugar, mirin, Dijon mustard, and garlic powder. Whisk everything together until smooth and well incorporated. The homemade tonkatsu sauce will bring an irresistible flavor to your Japanese Katsu Bowls, enhancing every delicious bite.
Step 7: Slice the Chicken
Once the chicken has fried to a golden perfection, transfer the pieces to a paper towel-lined plate to absorb excess oil and maintain their crispiness. Allow the katsu to rest for a few minutes before slicing it into strips. This helps the juices redistribute for a tender bite.
Step 8: Prepare the Bowls
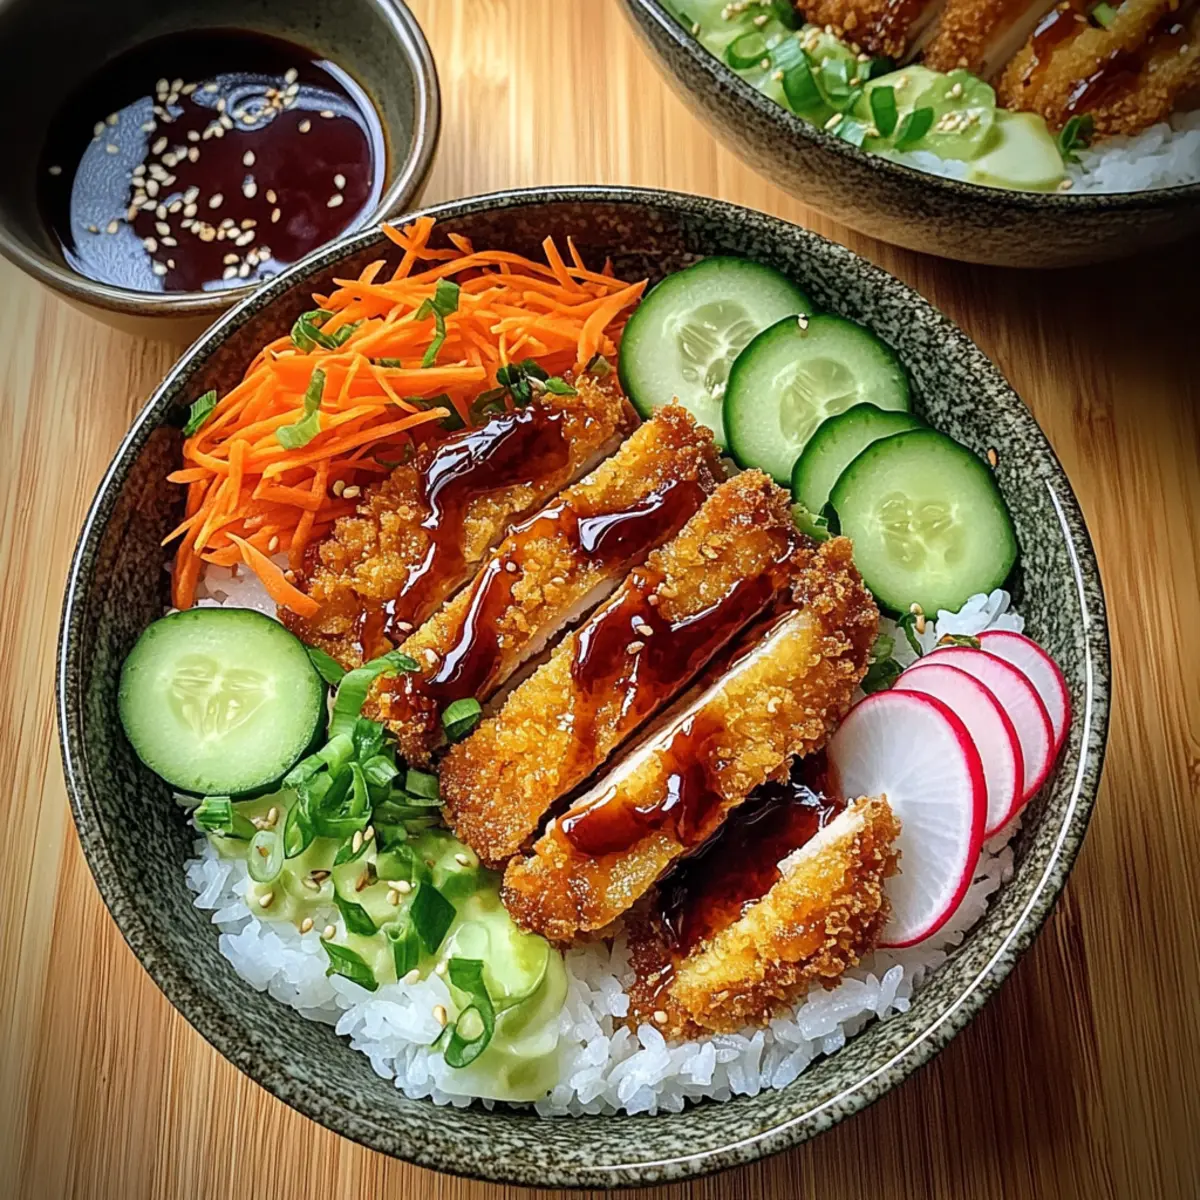
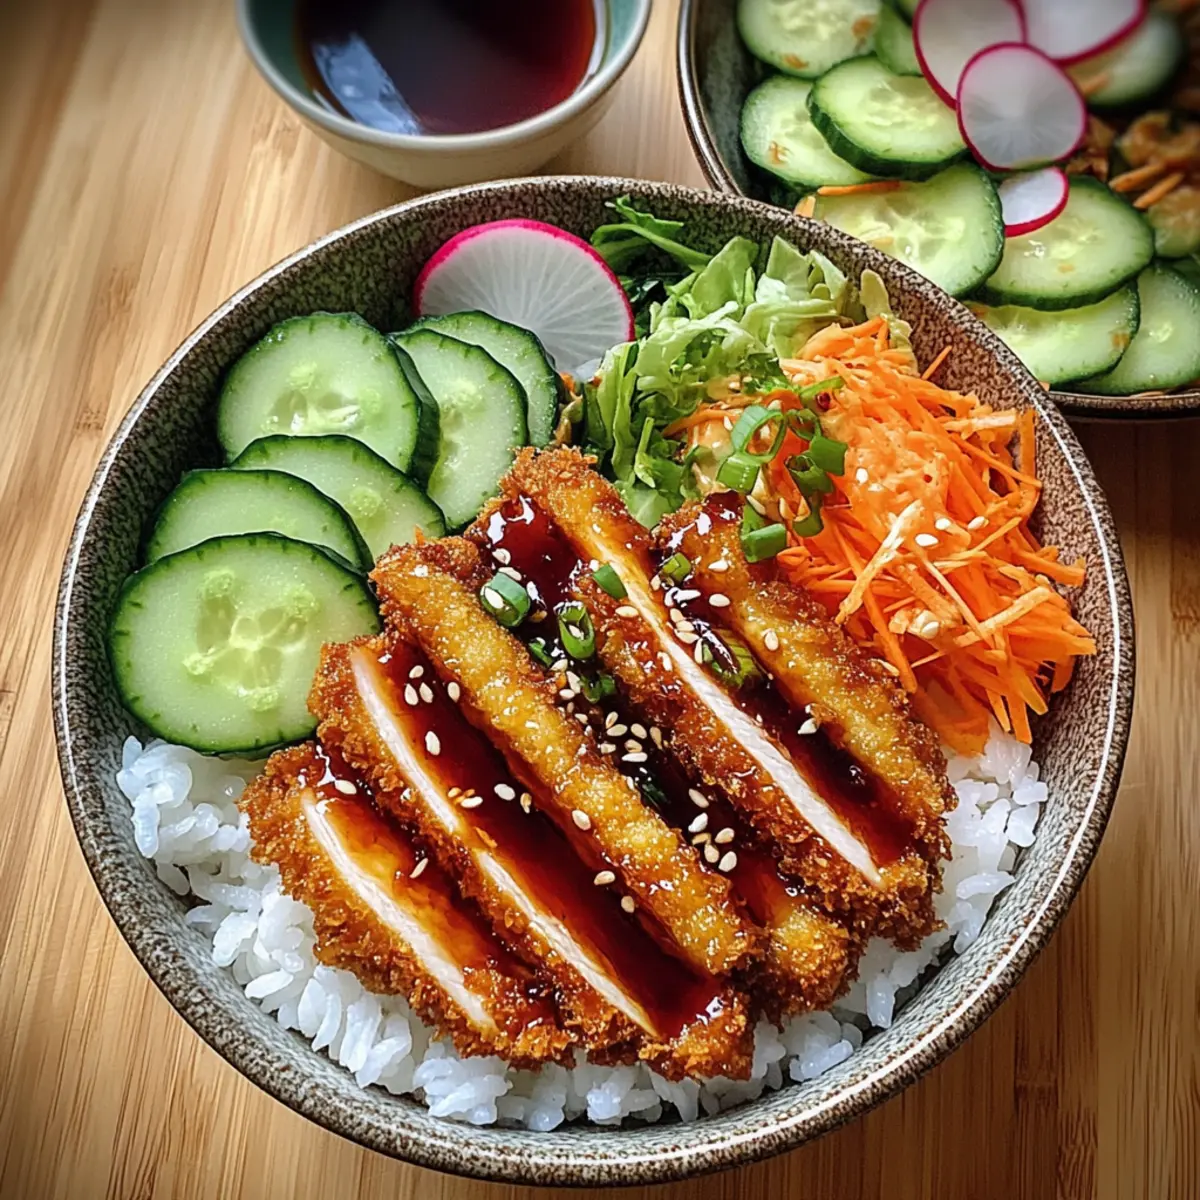
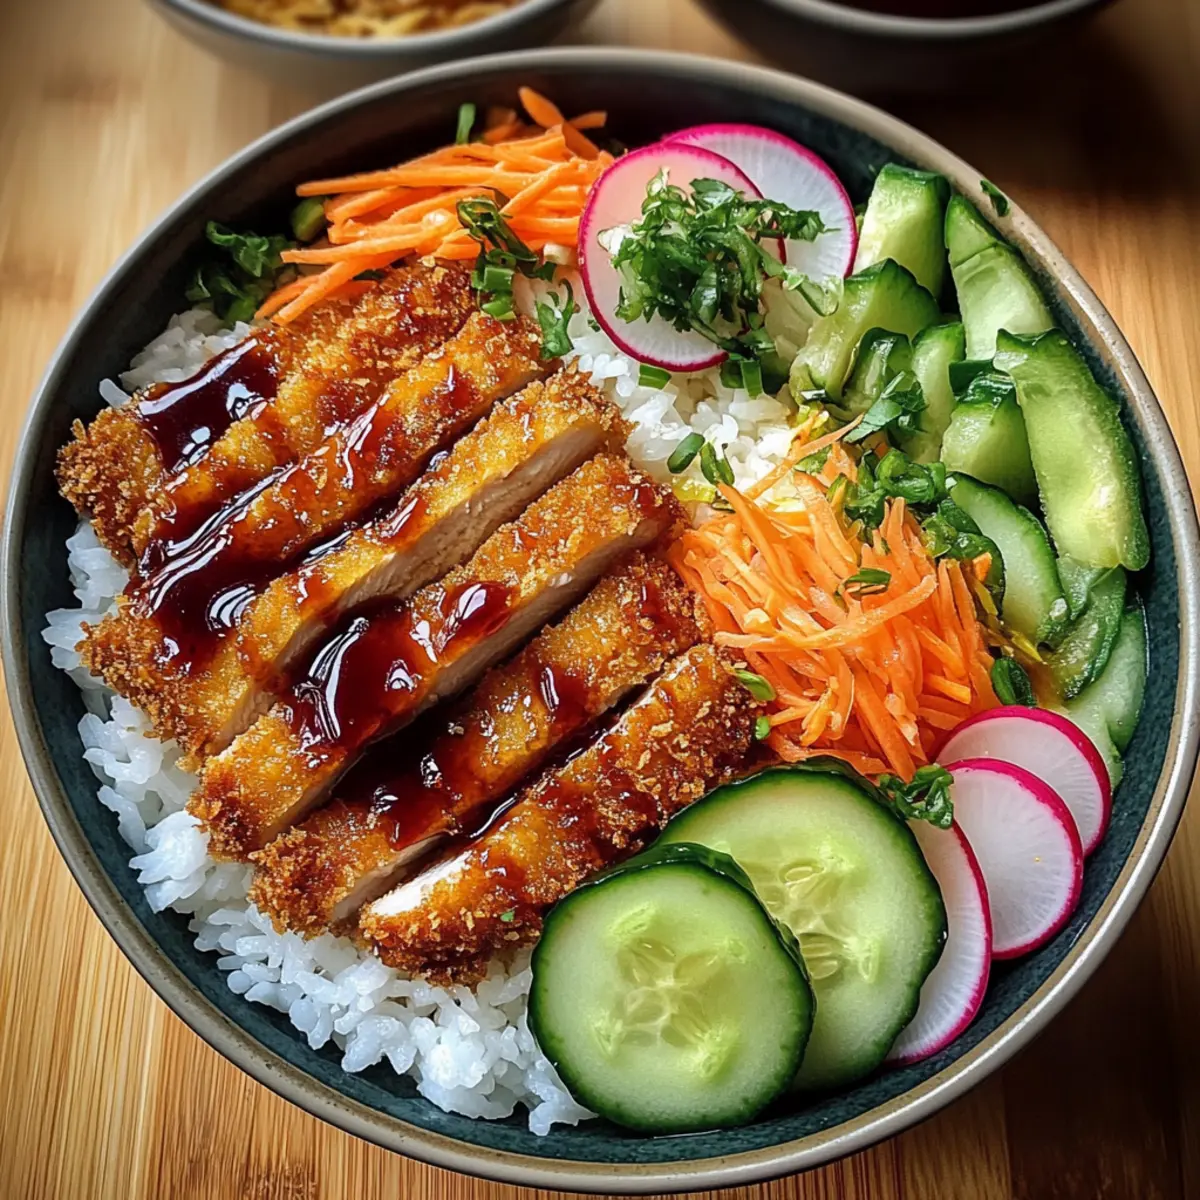
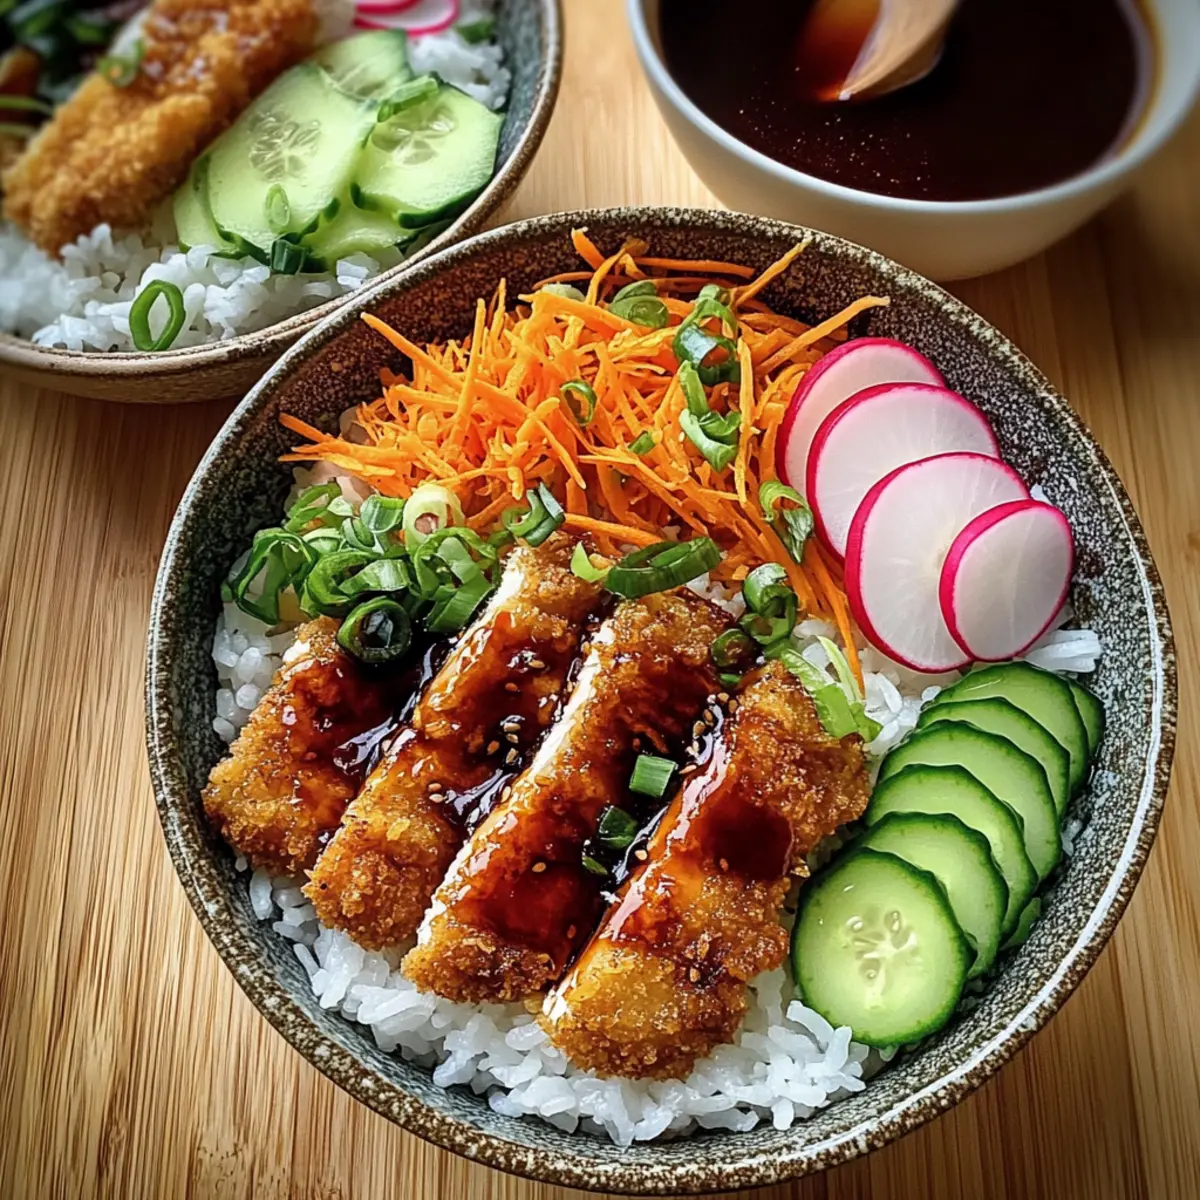
To create your Japanese Katsu Bowls, start by placing a generous scoop of fluffy cooked white rice at the bottom of each bowl. The rice serves as a comforting base that will soak up the rich flavors of the katsu and sauce, making each spoonful satisfying.
Step 9: Add Fresh Vegetables
Top the rice with an assortment of fresh vegetables, including shredded cabbage, sliced cucumber, radishes, and carrots. Arrange them artfully over the rice, adding vibrant colors and crunchy textures to your Katsu Bowls. This freshness beautifully contrasts with the crispy chicken.
Step 10: Assemble and Serve
Place the sliced chicken katsu on top of the arranged vegetables in the bowls. Drizzle generously with the homemade tonkatsu sauce, allowing it to cascade over the katsu and vegetables. Finally, garnish with chopped green onions and a sprinkle of sesame seeds for added flavor and visual appeal.
What to Serve with Japanese Katsu Bowls with Tonkatsu Sauce
Elevate your meal experience by balancing the heartiness of katsu with vibrant sides and soothing drinks.
-
Miso Soup: A warm and savory soup that adds umami richness, balancing the crispy katsu perfectly. It’s comforting and traditional, rounding out the Japanese theme beautifully.
-
Edamame: These tender, lightly salted soybeans offer a fresh, nutty bite, making them a fun appetizer that complements the flavors of your katsu bowls. Plus, they are packed with protein!
-
Pickled Vegetables: Bright, tangy, and crunchy, pickled veggies like ginger and cucumbers add refreshing contrast to the rich katsu. Their acidity helps cleanse the palate and energizes the meal.
-
Steamed Rice with Furikake: While your katsu already rests on a rice bed, adding a sprinkle of furikake seasoning enhances the flavor, providing umami depth from seaweed and sesame.
-
Japanese Potato Salad: Creamy and slightly sweet, this salad contrasts beautifully with the crispiness of katsu. The soft potatoes and crunch of veggies create a delightful textural experience.
-
Sake or Green Tea: Pair your meal with chilled sake for a traditional touch or serve hot green tea for its refreshing qualities. Both drinks enhance the overall dining experience by cleansing the palate.
-
Sesame Cabbage Slaw: Fresh and crunchy cabbage slaw with sesame dressing delivers a zesty crunch. It balances the richness of the katsu while adding a pleasing visual element to the plate.
-
Custard or Mochi for Dessert: End your meal on a sweet note with a light, custardy dessert or delicate mochi. Their soft textures and subtle sweetness provide a lovely finish to your katsu experience.
Make Ahead Options
These Japanese Katsu Bowls with Tonkatsu Sauce are perfect for meal prep enthusiasts! You can prepare the chicken katsu components up to 24 hours in advance by breading the chicken and storing it in the refrigerator, covered tightly to prevent moisture loss. Additionally, the tonkatsu sauce can be made ahead and refrigerated for up to 2 weeks. When you’re ready to serve, simply fry the prepped katsu until golden brown and crispy, which will only take 4-5 minutes per side. This way, you’ll enjoy delightful homemade katsu with minimal effort on busy weeknights—it’s a time-saving solution that doesn’t compromise on flavor!
Expert Tips for Japanese Katsu Bowls
-
Perfectly Pounded: Ensure the chicken breasts are pounded to an even ½ inch thickness to promote uniform cooking and tenderness, preventing dry spots.
-
Hot Oil Check: Test the oil’s temperature by dropping in a small piece of bread; it should sizzle immediately. This prevents greasy katsu and achieves that perfect crispiness.
-
Batch Frying: Avoid overcrowding the pan while frying; cooking in batches allows for even browning and crispy texture all around your Japanese Katsu Bowls.
-
Draining Excess Oil: After frying, place the katsu on paper towels to absorb excess oil, keeping it crispy and light without any unwanted greasiness.
-
Flavor Adjustments: Feel free to tweak the tonkatsu sauce to your taste; adjusting the sugar and ketchup can create the perfect balance of sweetness and tanginess.
-
Eat Fresh: For the best texture and flavor, serve your Katsu Bowls immediately after assembly; the fresh veggies and crispy katsu shine when enjoyed right away!
How to Store and Freeze Japanese Katsu Bowls
Fridge: Store leftover katsu in an airtight container for up to 3 days. To maintain crispiness, place a paper towel in the container to absorb moisture.
Freezer: Freeze cooked chicken katsu individually wrapped in plastic wrap and then in a freezer-safe bag for up to 2 months. Thaw in the fridge before reheating.
Reheating: For best results, reheat katsu in the oven or air fryer at 350°F (175°C) for about 10-15 minutes until crisp. This method helps restore that delightful crunch.
Tonkatsu Sauce: Keep any unused tonkatsu sauce in a sealed container in the fridge for up to two weeks, ready for your next Japanese Katsu Bowls!
Japanese Katsu Bowls Variations & Substitutions
Feel empowered to get creative with your Japanese Katsu Bowls, adjusting flavors and textures to suit your preferences!
- Gluten-Free: Use gluten-free flour and breadcrumbs for the chicken coating, ensuring everyone can enjoy this dish.
- Pork Option: Swap chicken for thinly sliced pork, which will create a traditional katsu experience that’s equally tasty.
- Tofu Twist: For a vegetarian alternative, use firm tofu, pressed and sliced, to soak up the delightful tonkatsu sauce.
- Spicy Sauce: Add chili flakes or a dash of hot sauce to the tonkatsu sauce for a fiery kick that will warm your palate.
- Seasonal Veggies: Incorporate seasonal vegetables like bell peppers or zucchini for a colorful twist that complements the katsu beautifully.
- Coconut Rice: Cook your rice in coconut milk for a creamy, slightly sweet flavor that’s a great pairing with the savory katsu.
- Pickled Garnish: Serve with pickled ginger or cucumber for an extra pop of flavor and a crunchy texture that balances the dish.
- Extra Crunch: For an added layer of texture, sprinkle some crispy fried onions on top of your finished bowl for that satisfying crunch.
Feeling adventurous? Pair your masterpiece with a warm bowl of Crockpot Garlic Butter for the ultimate cozy meal experience!
Japanese Katsu Bowls with Tonkatsu Sauce Recipe FAQs
What is the best way to select ripe chicken breasts for this recipe?
When choosing chicken breasts, look for boneless and skinless options that are plump and moist. Avoid any packages that have dark spots or excessive liquid, as this can indicate spoilage. Fresh chicken should have a light pink color with firm texture. For the best results, purchase chicken from a reputable source, and aim to use them within a couple of days for optimal freshness.
How should I store leftover Japanese Katsu Bowls?
To keep your katsu bowls fresh, place the leftover chicken katsu in an airtight container in the fridge for up to 3 days. Adding a paper towel at the bottom can help absorb any excess moisture, preserving the katsu’s crispiness. As for the fresh veggies, store them separately to maintain their texture and crunch.
Can I freeze chicken katsu, and if so, how?
Absolutely! To freeze the cooked chicken katsu, first, let it cool completely. Then, wrap each piece tightly in plastic wrap and place them in a freezer-safe bag. You can freeze them for up to 2 months. When ready to enjoy, simply thaw them in the refrigerator overnight and reheat in the oven or air fryer at 350°F (175°C) for about 10-15 minutes until crispy.
What are some common issues when making Japanese Katsu, and how can I troubleshoot them?
One common issue is soggy katsu, which often occurs if the oil is not hot enough. To troubleshoot, ensure the oil shimmers and is hot when frying. Also, do not overcrowd the pan, as this can lower the oil temperature and lead to softened breading. If you accidentally do overcrowd the pan, frying in smaller batches will yield better results. Always drain your fried katsu on paper towels to help absorb excess oil.
Are there any dietary considerations to keep in mind for this recipe?
Yes, if you’re cooking for someone with food allergies or dietary restrictions, consider using gluten-free flour and gluten-free soy sauce to make the dish gluten-free. Tofu can be a great substitute for chicken or pork if you’re looking for a vegetarian option, and it’s equally satisfying when prepared using the same techniques. Always check labels for hidden ingredients that could cause allergic reactions, especially in the sauces or breading materials.
What can I substitute for tonkatsu sauce if I don’t have the ingredients?
If you’re short on some ingredients, you can create a quick alternative by mixing together 2 tablespoons of ketchup, 1 tablespoon of soy sauce, and a dash of vinegar or citrus juice for tanginess. This won’t have the exact complexity of traditional tonkatsu sauce, but it still adds a nice flavor to your Japanese Katsu Bowls while you enjoy a delicious meal!
Crispy Japanese Katsu Bowls with Tonkatsu Sauce Bliss
Ingredients
Equipment
Method
- Pound the boneless, skinless chicken breasts to ½ inch thickness and season with salt and black pepper.
- Set up three shallow bowls: one with flour, one with beaten eggs, and one with panko breadcrumbs.
- Coat the chicken in flour, dip in egg, then press into panko breadcrumbs.
- Heat vegetable oil in a frying pan over medium-high heat until shimmering.
- Fry the breaded chicken for 4-5 minutes on each side until golden brown and cooked through.
- In a mixing bowl, whisk together ketchup, Worcestershire sauce, soy sauce, sugar, mirin, Dijon mustard, and garlic powder for the tonkatsu sauce.
- Once fried, transfer the chicken to a paper towel-lined plate to drain excess oil and slice into strips.
- In bowls, place rice at the bottom, then add fresh vegetables on top.
- Top with sliced chicken katsu and drizzle with tonkatsu sauce; garnish with green onions and sesame seeds.
Leave a Reply