
As I stood in my kitchen, the air filled with the sweet scent of melting chocolate, I couldn’t help but smile at the antics my kids were up to. With Halloween just around the corner, it was the perfect time to whip up some Mummy Rice Krispies Treats. This no-bake delight not only brings the joy of homemade treats into our lives but also adds a playful touch to our festive celebrations. With only three simple ingredients, these adorable mummies are both quick to prepare and a hit with the whole family. They’re the ideal addition to any Halloween gathering or school party, guaranteeing smiles and satisfied taste buds. So, are you ready to surprise your loved ones with these fun spooky snacks? Let’s get started!
Why are Mummy Rice Krispies Treats a must-try?
Endearing Appeal: These cute little mummies are guaranteed to put smiles on everyone’s faces, making them perfect for kids and adults alike.
No-Bake Ease: With just three ingredients, they save time in the kitchen, leaving more moments for family fun.
Party Perfect: Ideal for Halloween parties, classroom treats, or as sweet gifts, they’re a versatile addition to your holiday menu.
Customizable Fun: Don’t hesitate to get creative by using different bases or serving them on sticks—your imagination is the limit!
Memorable Experience: The joy of decorating and the laughter shared while making these treats create lasting Halloween memories.
Mummy Krispies Treats Ingredients
For the Base
• Premade Rice Krispies Treats – Provides a soft, chewy foundation for your spooky dessert; feel free to make homemade versions if you prefer.
For the Mummy Wrap
• Vanilla Melting Wafers or White Dipping Chocolate (10 oz.) – Perfect for creating the drizzled appearance of mummy bandages; add a teaspoon of coconut oil for a smooth drizzle if using real white chocolate.
For the Face
• Candy Eyes (40 pieces) – Essential for adding the cute, spooky look of your mummies; swaps for chocolate chips can offer a fun twist but won’t achieve the same visual impact.
Step‑by‑Step Instructions for Mummy Krispies Treats
Step 1: Prepare Baking Sheets
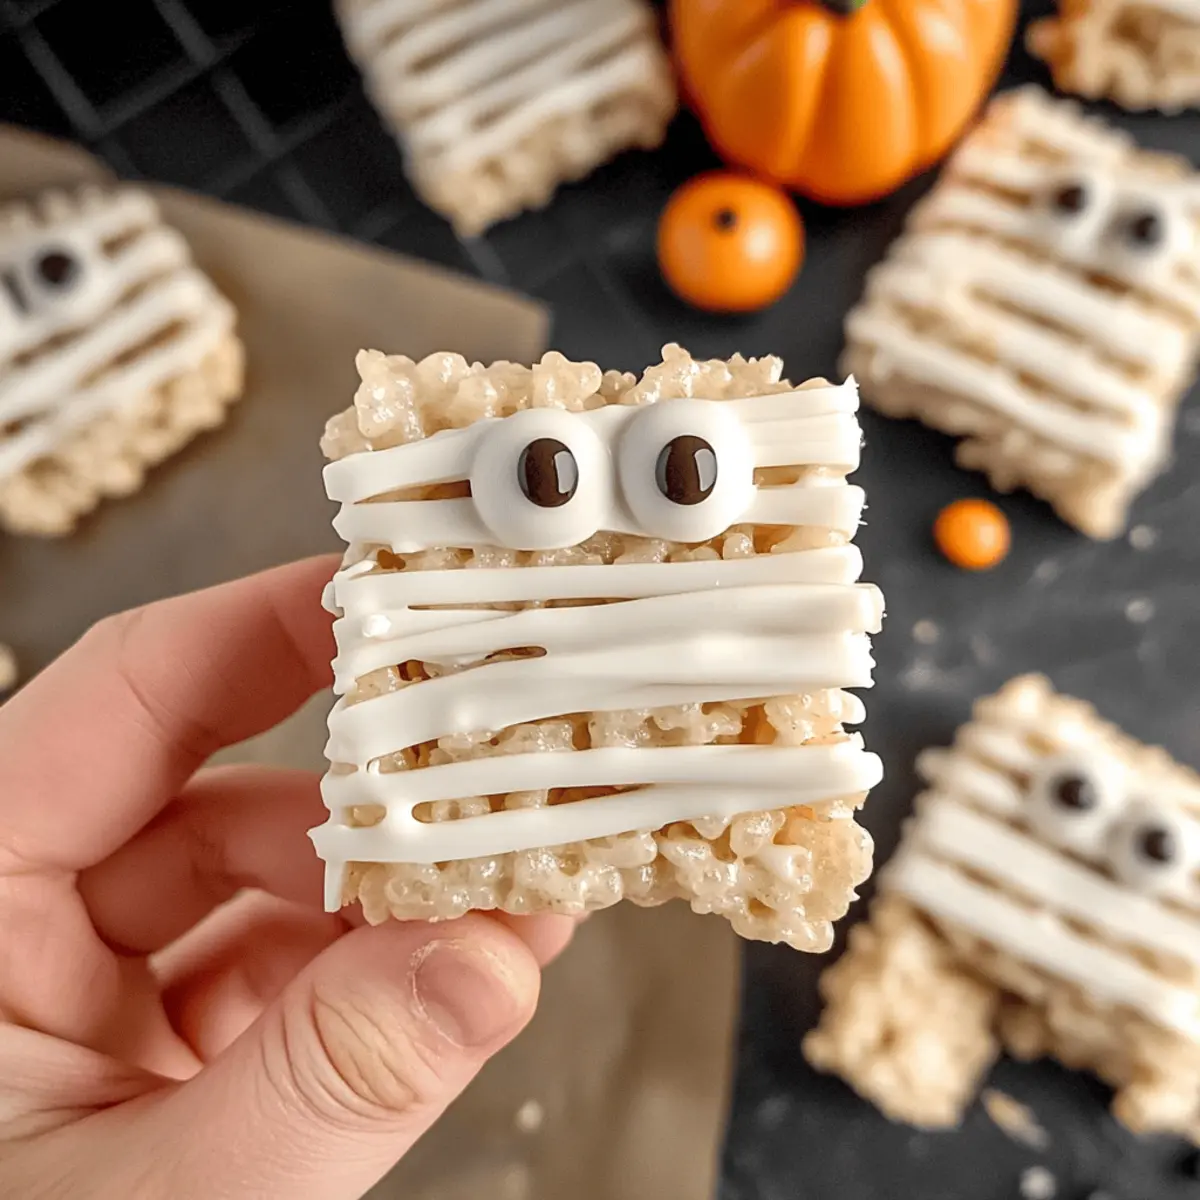
Begin by unwrapping the premade Rice Krispies Treats and placing them on two parchment-lined baking sheets. Ensure there is enough space between each treat to prevent them from sticking together. This essential step sets the foundation for your Mummy Krispies Treats, allowing them to maintain their adorable shape during the decorating process.
Step 2: Melt Chocolate
In a microwave-safe bowl, add the vanilla melting wafers or white dipping chocolate. Heat in 30-second increments at medium power, stirring well after each interval until fully melted and smooth—this should take about 1-2 minutes. The melted chocolate should have a glossy appearance, perfect for drizzling over your treats.
Step 3: Decorate Treats
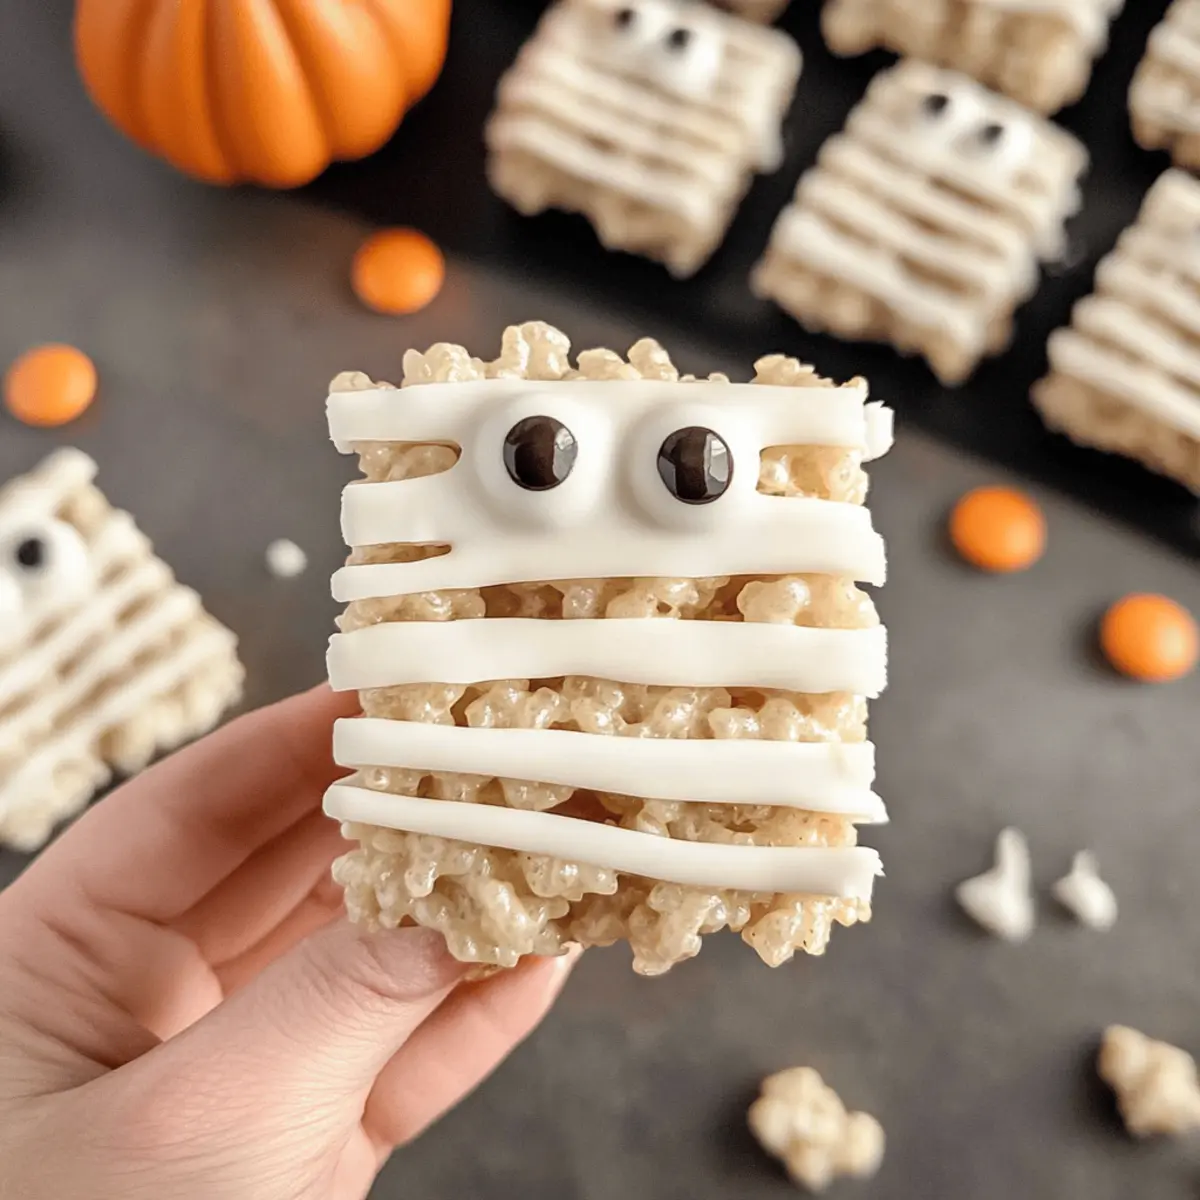
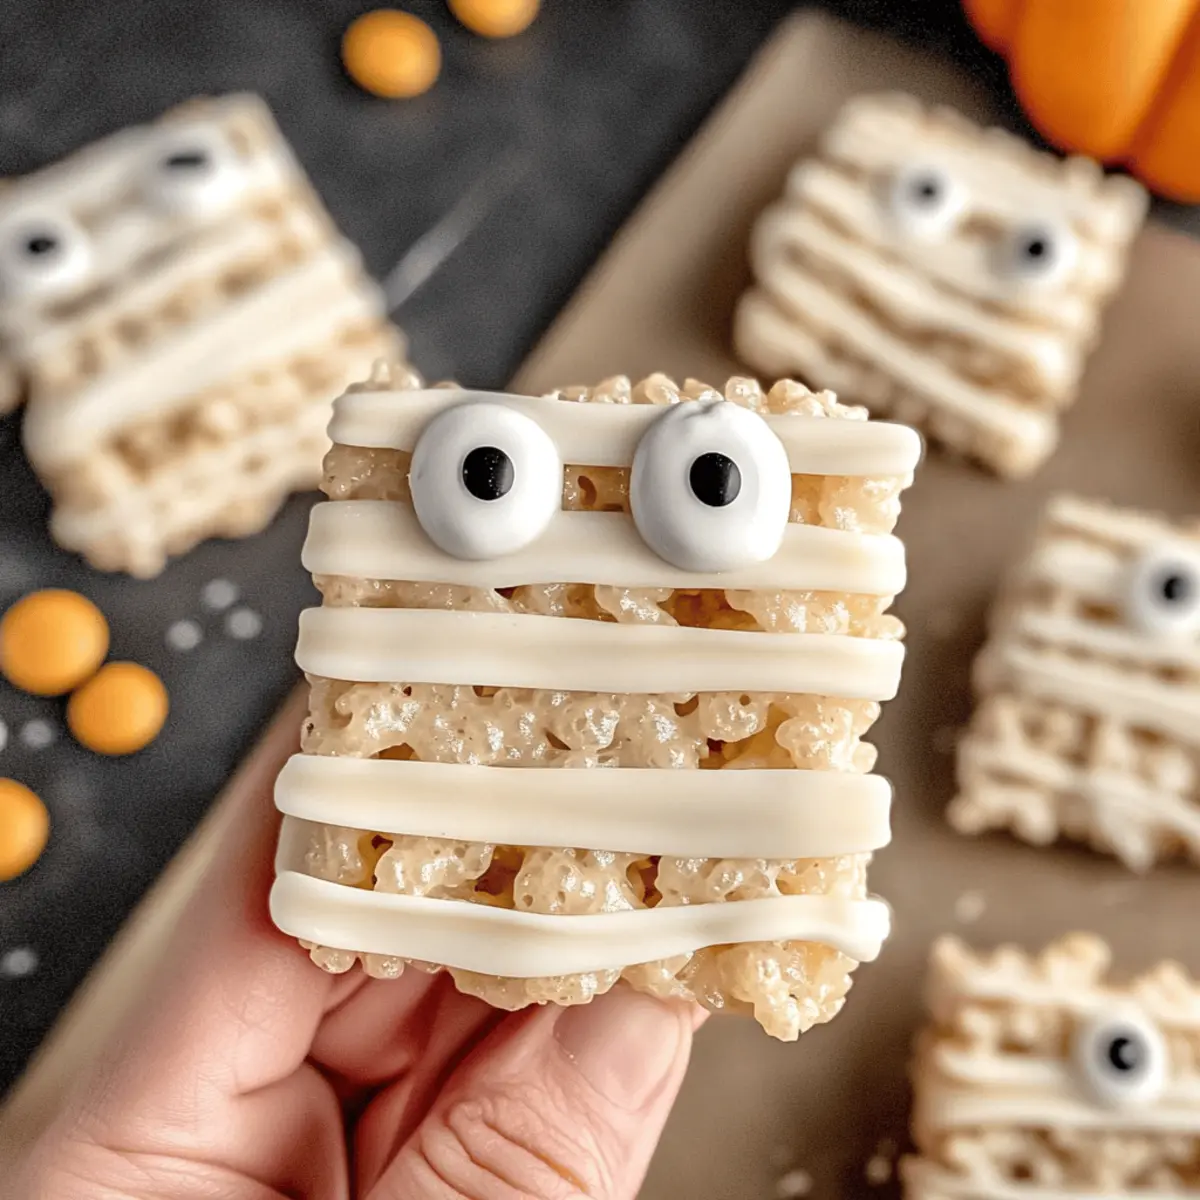
Using a piping bag fitted with a round tip or a simple spoon, drizzle the melted chocolate over the Rice Krispies Treats in alternating horizontal and zig-zag patterns. Aim for a mummy wrap effect, covering most of the surface to give your treats that spooky and fun look. Let the chocolate cool slightly to harden just a bit while you get ready for the next step.
Step 4: Apply Candy Eyes
Once the chocolate drizzle is set but not completely hardened, take two candy eyes for each treat and press them gently into the top third of each Rice Krispies Treat. To secure the eyes, use a small dab of the melted chocolate; this adds both a spooky charm and helps them stay in place. Allow the chocolate to dry for about 10-15 minutes at room temperature before serving.
Step 5: Enjoy Your Mummies
Now that your Mummy Krispies Treats are decorated and dried, they are ready to be displayed! These delightful treats make for a fun Halloween party centerpiece or can be individually wrapped for classroom treats. Store any leftovers in an airtight container at room temperature, but I doubt there will be any left after everyone sees these cute little mummies!
What to Serve with Mummy Rice Krispies Treats
These playful treats are sure to enchant your guests, so let’s complete the Halloween feast with delicious pairings!
-
Spooky Fruit Salad: A mix of seasonal fruits like oranges, grapes, and kiwi adds a fresh, vibrant contrast to the sweet treats. The bright colors make it a festive addition.
-
Witch’s Brew Hot Chocolate: Rich, creamy hot chocolate with whipped cream and sprinkles will delight both kids and adults. It perfectly complements the sweet flavors of the Mummy Rice Krispies Treats.
-
Ghostly Marshmallow Dips: Serve marshmallows dipped in white chocolate and adorned with mini chocolate chips as friendly ghost treats. Their fluffy texture pairs beautifully with the chewy Krispies.
-
Crispy Veggie Platter: Crunchy carrots, cucumbers, and celery served with a spooky ranch dip create a delightful crunch and balance to the sweetness. This contrast keeps the party snacks interesting.
-
Gummy Worm Cups: Fill clear cups with gummy worms and crushed cookies to create a playful and creepy dessert. They echo the Halloween theme, adding an element of fun!
-
Pumpkin Spice Cookies: These soft and flavorful cookies bring comforting autumn spices to the table and their sweetness pairs perfectly with the Mummy Rice Krispies Treats.
-
Apple Cider Punch: A refreshing mix of apple cider and ginger ale, garnished with sliced apples and cinnamon sticks. This drink brightens the overall experience and enhances the festive flavors.
-
Chocolate-Covered Pretzels: Salty and sweet, these bites offer a satisfying crunch that contrasts the soft treats. Their delicious coating makes them irresistible.
-
Creepy Cupcakes: Decorate cupcakes to look like monsters, which will wow everyone. These add visual excitement and deeper flavors, serving as both a treat and a festive decoration for your table.
Mummy Krispies Treats: Fun Variations
Feel free to unleash your creativity and customize these delightful treats to suit your taste and occasion!
-
Homemade Base: Make your own Rice Krispies treats using marshmallows and butter for a fresh, nostalgic flavor.
-
Chocolate Drizzle Twist: Swap vanilla melting wafers for milk or dark chocolate for a richer chocolatey experience on your mummies.
-
Colorful Decorations: Use colored candy eyes or chocolate melts to give your mummies a festive twist that’s sure to catch the eyes of your guests.
-
Nutty Crunch: Add a handful of chopped nuts or crushed pretzels for an added layer of texture and contrasting flavor.
-
Syrupy Sweetness: Before drizzling the chocolate, coat the treats lightly with caramel sauce for a sweet surprise that pairs wonderfully with the chocolate.
-
Fun & Cheesy: Use string cheese for the mummy wrap effect instead of chocolate, providing a quirky salty twist that kids will love.
-
Ghoulishly Spicy: Add a pinch of cayenne pepper to your chocolate for a surprising and adventurous kick that can be a conversation starter at your Halloween party.
-
Serving on Sticks: For a fun presentation, spear each treat with a lollipop stick before decorating to turn them into spooky pops!
These amazing variations can help make your Mummy Krispies Treats unique and unforgettable. Don’t hesitate to think outside the box with your Halloween creations—you’ll have everyone asking for your secret! If you’re looking for more ideas, check out our delicious Halloween treats to spark even more inspiration!
Expert Tips for Mummy Krispies Treats
-
Piping Precision: Use a #7 or #8 round piping tip for clean, defined drizzles that closely resemble mummy wrappings. This helps create that perfect spooky look!
-
Avoid Chocolate Clumping: If your melting chocolate cools and becomes too thick while decorating, reheat it for 15 seconds to restore a smooth consistency and ensure your Mummy Krispies Treats look fabulous.
-
Keep It Fresh: For a party-friendly option, individually wrap each treat or toss them in clear treat bags. This adds a fun touch and makes sharing easy!
-
Experiment with Flavors: Don’t hesitate to try different flavors of melting wafers or add a sprinkle of sea salt for a savory twist on these sweet Mummy Krispies Treats!
-
Decoration Fun: Encourage your kids to help with decorating! This interactive experience not only builds excitement but also makes for wonderful family memories during Halloween.
Make Ahead Options
These Mummy Rice Krispies Treats are perfect for busy home cooks looking to save time during the Halloween rush! You can prepare the Rice Krispies Treats up to 24 hours in advance and store them in an airtight container at room temperature to maintain their chewiness. For the mummy wrap, melt the vanilla melting wafers or white dipping chocolate no more than 3 days ahead; simply refrigerate the cooled chocolate in a sealed container. When you’re ready to create your spooky treats, drizzle the melted chocolate over the treats and add the candy eyes. This way, you’ll have a delightful dessert ready in no time, allowing you to enjoy the festivities stress-free!
How to Store and Freeze Mummy Krispies Treats
Room Temperature: Store your Mummy Krispies Treats in an airtight container at room temperature to keep them fresh. They will maintain their best quality for up to 4-5 days.
Freezer: If you’d like to save some for a later date, freeze the treats in a single layer on a baking sheet until solid. Then transfer them to a freezer-safe container or bag, where they can be kept for up to 3 months.
Thawing: To enjoy frozen Mummy Krispies Treats, let them thaw at room temperature for about 30 minutes before serving. This helps them regain their chewy texture.
Reheating: If they harden up after freezing, a quick 10-second microwave burst can soften them slightly, making them irresistible again!
Mummy Krispies Treats Recipe FAQs
How do I select the best Rice Krispies Treats for this recipe?
For the base of your Mummy Krispies Treats, I recommend using fresh premade Rice Krispies Treats. They should be soft and chewy without any dark spots or hard edges. If you prefer a homemade touch, you can prepare your own by melting marshmallows and butter, mixing them with Rice Krispies cereal, and allowing them to set.
How should I store the Mummy Krispies Treats?
Absolutely! Store your Mummy Krispies Treats in an airtight container at room temperature. They’re best enjoyed within 4-5 days for optimal freshness, but they will remain tasty beyond that—a little less chewy, perhaps, but still delicious.
Can I freeze Mummy Krispies Treats?
Yes, you can! To freeze your treats, simply place them in a single layer on a baking sheet and freeze until solid—this helps prevent them from sticking together. Then, transfer them to a freezer-safe container or bag and store for up to 3 months. When you’re ready to enjoy, let them thaw at room temperature for about 30 minutes before serving.
What should I do if the melting chocolate is too thick?
If your melting chocolate hardens while you’re decorating, don’t worry! Just pop it back in the microwave for 15 seconds, then stir. Repeat if necessary until it regains its smooth, drizzling consistency. This ensures that your mummy treats look just as delightful as you intended!
Are these treats suitable for children with allergies?
Great question! Since Mummy Krispies Treats primarily use Rice Krispies, melting wafers, and candy eyes, it’s essential to check for any specific allergies, especially gluten or dairy. Some melting wafers may contain allergens, so be sure to look for allergy-friendly options. Always read the labels to ensure they’re safe for your little ones!
Can I customize the Mummy Krispies Treats for different occasions?
Absolutely! You can definitely get creative with these treats. Consider using a brownie or cookie base instead of Rice Krispies for a fun twist. You could also switch up the decorating theme by using colored melting wafers or different types of sprinkles to match birthday parties or other events. The more the merrier!

Mummy Krispies Treats: Spooktacular Fun for Halloween Parties
Ingredients
Equipment
Method
- Prepare Baking Sheets: Unwrap the Rice Krispies Treats and place them on two parchment-lined baking sheets, ensuring enough space between each treat.
- Melt Chocolate: In a microwave-safe bowl, add the melting wafers or white dipping chocolate, and heat in 30-second increments, stirring until fully melted and smooth.
- Decorate Treats: Drizzle the melted chocolate over the Rice Krispies Treats in alternating horizontal and zig-zag patterns to create the mummy wrap effect.
- Apply Candy Eyes: Once the chocolate drizzle is set but not completely hardened, press two candy eyes into the top third of each treat.
- Enjoy Your Mummies: Display the decorated treats, store leftovers in an airtight container at room temperature.
Leave a Reply